
Table of Contents
Welcome to the crunchiest, healthiest snack revolution! This Zucchini Chips Recipe transforms humble green squash into addictive crisps using simple techniques and bold spices. Gluten-free and endlessly customizable.
A Little Story
Like many of you, I spent years battling afternoon snack attacks with greasy potato chips. That changed when my garden overflowed with zucchinis one summer. After countless experiments, this Zucchini Chips Recipe became my family’s favorite way to enjoy nature’s bounty guilt-free.
Get Ready to Cook!
Grab your mandolin and let’s create magic. These dehydrated wonders require patience, but the payoff is unforgettable.
What to Expect
- Time: 2 hours (15 mins prep + 1h45m baking)
- Difficulty: Beginner-friendly

Before You Begin
Uniform slices = even crisping! Use a mandolin if possible. Salting draws out moisture – don’t skip this step unless you enjoy soggy chips.
Ingredients You’ll Need
| Ingredient | Quantity |
|---|---|
| Zucchinis (medium) | 2 |
| Olive oil | 1-2 tbsp |
| Sea salt | ½ tsp |
| Garlic powder | ½ tsp |
| Smoked paprika | ½ tsp |
| Black pepper | ¼ tsp |
| Grated parmesan | To taste |

Step-by-Step Guide
- Preheat oven to 250°F (120°C)
- Wash/dry zucchinis thoroughly
- Slice into 1/8″ rounds using knife/mandolin
- Arrange slices on paper towels, lightly salt
- Wait 10 minutes, pat dry with new towels
- Toss with olive oil in large bowl
- Add salt, garlic powder, paprika, pepper
- Optional: Sprinkle parmesan before tossing
- Line baking sheet with parchment paper
- Arrange slices in single layer
- Bake 1.5-2 hours, flipping halfway
- Check at 90 minutes – should be golden/crispy
Pointers for Perfection & Storage
Pro Tip: Chips continue crisping as they cool! Test doneness by letting one cool 5 minutes before deciding they need more oven time.
Store in airtight container up to 3 days. If they soften, revive in 300°F oven for 5 minutes.
Craving more zucchini magic? Try these Zucchini Fritters Vegan Gluten Free Dairy Free next!
Print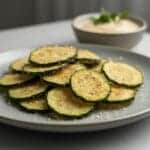
Zucchini Chips Recipe
- Total Time: 45
- Yield: 4 servings 1x
- Diet: Gluten Free
Description
These Gluten Free Zucchini Chips are the ultimate healthy snack—crispy, cheesy, and totally addictive. By replacing traditional breadcrumbs with a savory blend of almond flour and parmesan cheese, you get all the crunch without the gluten or excess carbs. Perfect for dipping in marinara or ranch, they are a delicious way to use up fresh summer zucchini.
Ingredients
2 medium zucchini
2 large eggs, beaten
1 cup almond flour (finely ground)
1/2 cup grated Parmesan cheese
1 teaspoon garlic powder
1/2 teaspoon smoked paprika
1/2 teaspoon salt
1/4 teaspoon black pepper
Olive oil spray (for baking)
Instructions
1. Preheat & Prep: Preheat your oven to 400°F (200°C). Line two large baking sheets with parchment paper and lightly spray with olive oil.
2. Slice Zucchini: Wash and dry the zucchini. Slice them into thin, even rounds (approximately 1/4 inch thick). *Tip: A mandoline slicer works best for consistent thickness.*
3. Prepare Stations: Set up a breading station. In one shallow bowl, whisk the eggs. In a second shallow bowl, combine the almond flour, grated Parmesan cheese, garlic powder, smoked paprika, salt, and black pepper. Mix well.
4. Coat: Dip each zucchini round into the beaten egg, shaking off any excess. Then, press it into the almond flour mixture, ensuring both sides are well coated.
5. Arrange: Place the coated rounds on the prepared baking sheets in a single layer, making sure they do not overlap.
6. Bake: Lightly spray the tops of the chips with olive oil spray. Bake for 15 minutes. Remove from the oven, flip each chip over, and bake for another 10–15 minutes, or until golden brown and crispy.
7. Serve: Remove from the oven and let cool for 5 minutes (they will crisp up further as they cool). Serve warm with your favorite dipping sauce.
Notes
Zucchini Size: Choose small to medium zucchini for the best flavor and texture. Large zucchini can be watery and have large seeds.
Crispiness: For extra crunch, ensure the zucchini slices are not too thick. If they seem soft after baking, you can leave them in the turned-off oven with the door slightly ajar for a few minutes to dehydrate further.
Air Fryer Method: These can be air fried at 375°F (190°C) for 10–12 minutes, flipping halfway through.
Storage: These chips are best eaten fresh. If you have leftovers, reheat them in the oven or air fryer to restore crispiness; do not microwave.
- Prep Time: 15
- Cook Time: 30
- Category: Appetizer
- Method: Baking
- Cuisine: American
Nutrition
- Serving Size: 1 serving
- Calories: 180
- Sugar: 3
- Sodium: 320
- Fat: 14
- Saturated Fat: 3
- Unsaturated Fat: 10
- Trans Fat: 0
- Carbohydrates: 8
- Fiber: 3
- Protein: 10
- Cholesterol: 95
Your Burning Questions Answered!
Q1: How do I make sure my zucchini chips get crispy?
A: Low-and-slow baking plus thorough drying (pre-salt step) is crucial for crispiness in any Zucchini Chips Recipe.
Q2: Can I store zucchini chips long-term?
A: These are best fresh, but you can freeze them in single layers for up to 1 month. Re-crisp in oven when ready to eat.
Q3: What seasonings work best beyond the recipe?
A: Nutritional yeast adds cheesiness, cayenne brings heat, or ranch powder creates classic flavor – perfect for customizing your Zucchini Chips Recipe.
Dig In & Enjoy!
This Zucchini Chips Recipe proves healthy snacking can be irresistible. Golden, crunchy, and packed with flavor – you’ll never miss store-bought chips again.
For more delicious ideas, follow me on Pinterest.