
Table of Contents
Indulge in the ultimate comfort food with these Stuffed Crust Pizza Buns! A gluten-free twist on a classic favorite, these buns are packed with gooey cheese in every bite, topped with tangy tomato sauce, and sprinkled with your favorite toppings. Perfect for a cozy night in or a fun family dinner, these Stuffed Crust Pizza Buns are sure to become a new favorite.
I remember the first time I tried making Stuffed Crust Pizza Buns. It was a rainy afternoon, and I wanted something warm and comforting. As I kneaded the dough and stuffed it with cheese, the aroma filled my kitchen, and I knew I was onto something special. Now, every time I make these buns, they bring back those cozy memories and create new ones with my family.
Get ready to cook up a storm with these delicious Stuffed Crust Pizza Buns. Let’s dive into the recipe and make some magic happen in your kitchen!
What to Expect
- Time: Approximately 2 hours (including proofing time)
- Difficulty: Intermediate

Before You Begin
Before you start, make sure you have all your ingredients measured and ready to go. This recipe requires a bit of patience, especially with the proofing time, but the end result is well worth the wait. Also, ensure your workspace is generously floured to handle the sticky dough.
Ingredients You’ll Need
| Gluten Free Brioche Dough | Quantity |
|---|---|
| Whole psyllium husk | 10 g (2 tbsp) |
| Lukewarm water | 140 g (½ cup + 1½ tbsp) |
| Tapioca starch | 115 g (1 cup) |
| Millet flour | 65 g (½ cup), plus extra for flouring the surface |
| Sorghum flour | 30 g (4 tbsp) |
| Caster/superfine or granulated sugar | 10 g (1 tbsp) |
| Instant yeast | 4 g (1¼ tsp) |
| Baking powder | 4 g (1 tsp) |
| Xanthan gum | 4 g (1½ tsp) |
| Salt | 4 g (¾ tsp) |
| Whole milk, lukewarm | 60 g (¼ cup) |
| US large/UK medium egg, room temperature | 1 |
| Olive oil | 25 g (2 tbsp) |
| For Stuffed Crust | Quantity |
| Coarsely grated/shredded low-moisture mozzarella cheese | 100 g (about 1 cup) |
| Coarsely grated/shredded cheddar cheese | 100 g (about 1 cup) |
| Toppings | Quantity |
| US large/UK medium egg, whisked, for egg washing the edges | 1 |
| Tomato sauce | 6 tbsp |
| Coarsely grated/shredded low-moisture mozzarella cheese | 75 g (about ¾ cup) |
| Coarsely grated/shredded cheddar cheese | 75 g (about ¾ cup) |
| Olives, sliced | 60 g (about ½ cup) |
Step-by-Step Guide
- Make the psyllium gel: In a bowl, mix together the psyllium husk and lukewarm water. After about 30-45 seconds, a gel will form.
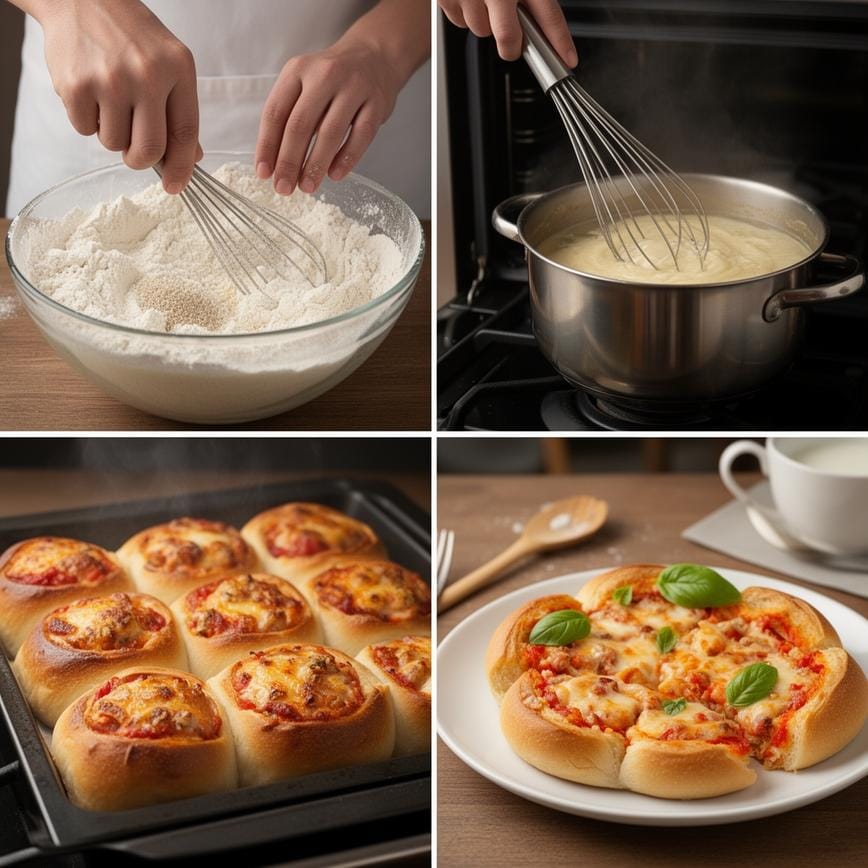
- Mix dry ingredients: In a large bowl or the bowl of a stand mixer, whisk together the tapioca starch, millet flour, sorghum flour, sugar, instant yeast, baking powder, xanthan gum, and salt.
- Combine wet ingredients: Add the milk, egg, and oil to the psyllium gel, and mix well to combine.
- Knead the dough: Make a well in the middle of the dry ingredients and add the psyllium gel-egg mixture. Knead the dough until smooth and all the ingredients are evenly incorporated, then knead for a further 4-5 minutes (if using a stand mixer) or 6-8 minutes (if kneading by hand).
- Shape the dough: Turn out the dough onto a generously floured surface, and dust the top of the dough with flour as well. Give it a gentle knead and shape it into a ball. Divide the dough into six equal portions (each should weigh about 86g) and shape them into smooth balls.
- Create the stuffed crust: Roll out each dough ball into a roughly 7-inch (18cm) circle. Mix together the grated cheddar and mozzarella, and arrange them around the edges of the dough circle, creating an approximately ¾-inch (2cm) border of cheese. Fold the edges of the dough circle over the cheese, overlapping the dough as needed, and press down to seal.
- Proof the buns: Lightly cover the buns with a sheet of plastic wrap/cling film and proof in a warm spot for about 1 hour to 1 hour 15 minutes, until they’re slightly puffed up.
- Preheat the oven: About 20 minutes before the buns finish proofing, start preheating the oven. Adjust the oven rack to the middle position and preheat the oven to 375ºF (190ºC).
- Assemble the pizza buns: Egg wash the edges of each bun. Spoon about 1 tablespoon of tomato sauce into each “well”, spreading it out so it covers the whole “well” of the bun as well as part of the raised edge. Sprinkle generously with grated cheese and top with sliced olives.
- Bake the buns: Bake the buns at 375ºF (190ºC) for about 18-20 minutes or until the dough is deep golden brown and the cheese is gooey, bubbly, and starts browning in spots.
- Cool and serve: Allow the buns to cool for 5-10 minutes before you serve them. Enjoy them while they’re still slightly hot for the best experience.
Pointers for Perfection & How to Store
For the best results, make sure your dough is well-kneaded and smooth. This will give your Stuffed Crust Pizza Buns the perfect texture. If you find the dough too sticky to handle, you can chill it in the fridge for about an hour before shaping.
To store, keep the buns in an airtight container in the refrigerator for up to 3 days. You can also freeze them for up to a month. Just reheat in the oven before serving.
For more delicious gluten-free recipes, check out this Chicken Crust Pizza Gluten Free Recipe.
Print
Stuffed Crust Pizza Buns
- Total Time: 65
- Yield: 12 buns 1x
- Diet: Gluten Free
Description
These Gluten-Free Stuffed Crust Pizza Buns are the ultimate comfort food dinner. Soft, fluffy gluten-free dough is wrapped around a savory core of gooey mozzarella cheese, zesty pizza sauce, and pepperoni. Baked until golden brown and brushed with garlic herb butter, they taste just like a stuffed crust pizza in a fun, handheld bun.
Ingredients
— The Dough —
2 ½ cups gluten-free all-purpose flour (ensure it contains xanthan gum)
1 packet (2 ¼ tsp) instant yeast
1 tablespoon sugar (to activate yeast)
1 teaspoon salt
1 teaspoon baking powder
1 cup warm water (110°F/45°C)
2 tablespoons olive oil
1 large egg, room temperature
1 teaspoon apple cider vinegar (helps with texture)
— The Filling —
12 mozzarella string cheese sticks (cut into thirds) or 1 ½ cups cubed mozzarella
½ cup gluten-free pepperoni slices, chopped
½ cup thick pizza sauce (plus extra for dipping)
— Garlic Butter Topping —
3 tablespoons unsalted butter, melted
½ teaspoon garlic powder
1 teaspoon dried parsley or Italian seasoning
2 tablespoons grated Parmesan cheese
Instructions
1. Activate Yeast: In a small bowl or measuring cup, mix the warm water and sugar. Sprinkle the yeast over the top and let it sit for 5–10 minutes until it becomes frothy.
2. Mix Dry Ingredients: In the bowl of a stand mixer (or a large bowl), whisk together the gluten-free flour, salt, and baking powder.
3. Make Dough: Add the yeast mixture, olive oil, egg, and vinegar to the dry ingredients. Mix on low speed, then increase to medium-high and beat for 3–5 minutes. The dough will be sticky and soft (like a thick batter)—this is normal for gluten-free yeast dough.
4. Shape Buns: Lightly oil your hands or dust them with GF flour. Divide the dough into 10–12 equal portions. Flatten each portion into a disk in your palm.
5. Stuff: Place a chunk of mozzarella (or folded string cheese pieces), a few pieces of pepperoni, and a teaspoon of pizza sauce in the center of the disk. *Be careful not to overfill or they may leak.*
6. Seal: Pull the edges of the dough up over the filling and pinch them tightly together to seal, forming a smooth ball.
7. Rise: Place the buns seam-side down in a greased baking dish or cast-iron skillet (leave a little space between them). Cover loosely with plastic wrap and let rise in a warm place for 20–30 minutes (they will puff up slightly).
8. Preheat: While the buns rise, preheat your oven to 375°F (190°C).
9. Bake: Bake for 20–25 minutes, or until the tops are golden brown and the dough is cooked through.
10. Garnish: Whisk the melted butter, garlic powder, and parsley together. Brush generously over the hot buns immediately after taking them out of the oven. Sprinkle with Parmesan cheese and serve warm with extra sauce for dipping.
Notes
Flour Blend: Use a high-quality ‘measure-for-measure’ gluten-free flour blend. If your blend does not have xanthan gum, add 1 teaspoon.
Dairy-Free: Use plant-based butter and dairy-free mozzarella shreds/sticks to make this recipe dairy-free.
Make Ahead: You can assemble the buns, cover them, and refrigerate them for up to 24 hours before baking. Let them come to room temperature while the oven preheats.
Storage: Store leftovers in an airtight container in the fridge for up to 3 days. Reheat in the microwave or air fryer to melt the cheese inside.
- Prep Time: 20
- Cook Time: 25
- Category: Dinner
- Method: Baking
- Cuisine: Italian-American
Nutrition
- Serving Size: 1 bun
- Calories: 180
- Sugar: 2
- Sodium: 340
- Fat: 9
- Saturated Fat: 4
- Unsaturated Fat: 4
- Trans Fat: 0
- Carbohydrates: 20
- Fiber: 1
- Protein: 6
- Cholesterol: 25
Your Burning Questions Answered!
- Can I use a different type of flour?
- Yes, you can substitute the millet flour with finely milled/ground brown rice flour, and the sorghum flour with light buckwheat flour, white teff flour, or oat flour (if you’re not sensitive to oats).
- Can I make these buns ahead of time?
- Absolutely! You can prepare the dough and shape the buns, then refrigerate them overnight. Just let them come to room temperature and proof before baking.
What other toppings can I use?
Feel free to get creative with your toppings. You can use pepperoni, mushrooms, bell peppers, or any of your favorite pizza toppings.
Dig In & Enjoy!
There you have it—delicious Stuffed Crust Pizza Buns that are sure to impress. Whether you’re making them for a family dinner or a gathering with friends, these buns are a crowd-pleaser. So, roll up your sleeves, get cooking, and enjoy the cheesy goodness!
For more delicious ideas, follow me on Pinterest.