
Table of Contents
Discover the delight of making your own Gluten-Free Mini Tart with this easy-to-follow recipe. Perfect for any occasion, these mini tarts are crisp, flaky, and utterly delicious. Whether you’re hosting a party or simply treating yourself, these Gluten-Free Mini Tart shells are sure to impress.
I first stumbled upon the idea of making Gluten-Free Mini Tart when I was looking for a way to enjoy my favorite desserts without the gluten. After several trials and errors, I perfected this recipe, and now it’s a staple in my kitchen. The joy of biting into a perfectly baked Gluten-Free Mini Tart is unmatched, and I’m excited to share this recipe with you.
Get ready to cook up a storm with this fantastic Gluten-Free Mini Tart recipe. Let’s dive in!
What to Expect
- Time: Approximately 45 minutes
- Difficulty: Intermediate
Before You Begin
Before you start, ensure all your ingredients are measured and ready to go. This will make the process smoother and more enjoyable. Also, make sure your butter is cold, as this is crucial for achieving that flaky texture in your Gluten-Free Mini Tart shells.
Ingredients You’ll Need
| Ingredient | Quantity |
|---|---|
| Gluten-free flour blend, King Arthur Measure for Measure recommended | ⅔ c |
| Powdered sugar | 2 Tbsp |
| Cold salted butter, cut into small chunks | 5 Tbsp |
| Egg yolk (large egg) | 1 |
| Cold water | 1 Tbsp + 1 tsp |
| Vanilla extract, powder or bean paste | ½ tsp |
Step-by-Step Guide
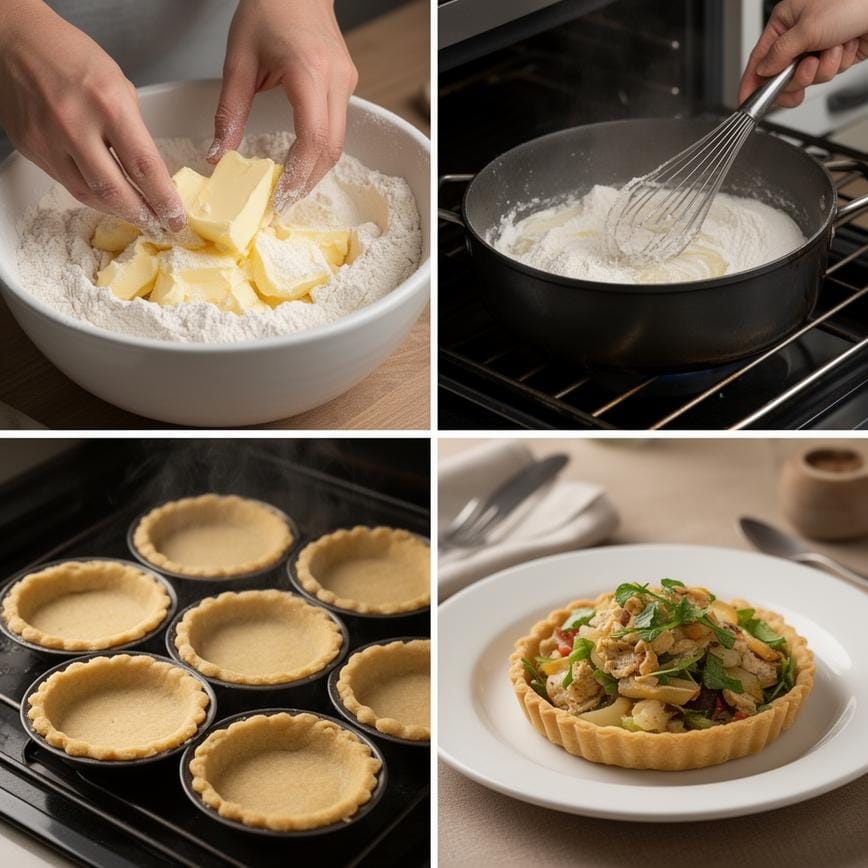
- In a medium-sized mixing bowl, mix the gluten-free flour and powdered sugar together with a fork or whisk.
- Add the chunks of butter to the flour mixture. Use your fingertips to press the flour and butter together, creating thin flakes of butter for a flaky crust.
- Beat the egg yolk, water, and vanilla together in a small bowl. Add this mixture to the flour/butter mixture and use a wooden spoon or rubber/silicone spatula to combine.
- Pull the dough together into a ball and place on a floured surface. Form the ball into a 1″ thick disk.
- Sprinkle a little flour on top of the dough and cover with 2 long overlapping sheets of plastic wrap. Roll the dough to ⅛ inch thick.
- Cut out circles that are ½ inch wider than the width plus height of your pans. For 3-inch wide, ½-inch high pans, use a 4-inch cutter.
- Center the circle over the pan and gently drop it in. Lightly press the dough against the edges.
- Use a butter knife or small offset spatula to press around the edge of the pan to remove excess dough.
- Pull the remaining dough together and repeat steps 6-8.
- Line the pans with cupcake liners and add pie weights (dry beans or dry rice are okay).
- Preheat the oven to 350°F and chill the tart shells in the refrigerator for 10 minutes.
- Bake for 15 minutes. Remove the pan from the oven, remove the paper liners and pie weights. Use a fork to prick the dough on the bottom.
- Bake for 8-10 minutes more or until the shells turn golden on the edges.
- Place the pan on a wire rack to cool for 15 minutes. Then carefully remove the shells from the pan(s) and complete cooling on a wire rack.
- Fill with lemon custard, lemon curd, chocolate custard, or chocolate ganache.
Pointers for Perfection & How to Store
For the perfect Gluten-Free Mini Tart, ensure your butter is cold and handle the dough as little as possible to keep it flaky. Store your baked tart shells in an airtight container at room temperature for up to 3 days or freeze for up to a month.
For another great gluten-free recipe, check out this Gluten Free Oat Flour Pie Crust.
Print
Gluten-Free Mini Tart
- Total Time: 32
- Yield: 12 mini tarts 1x
- Diet: Gluten Free
Description
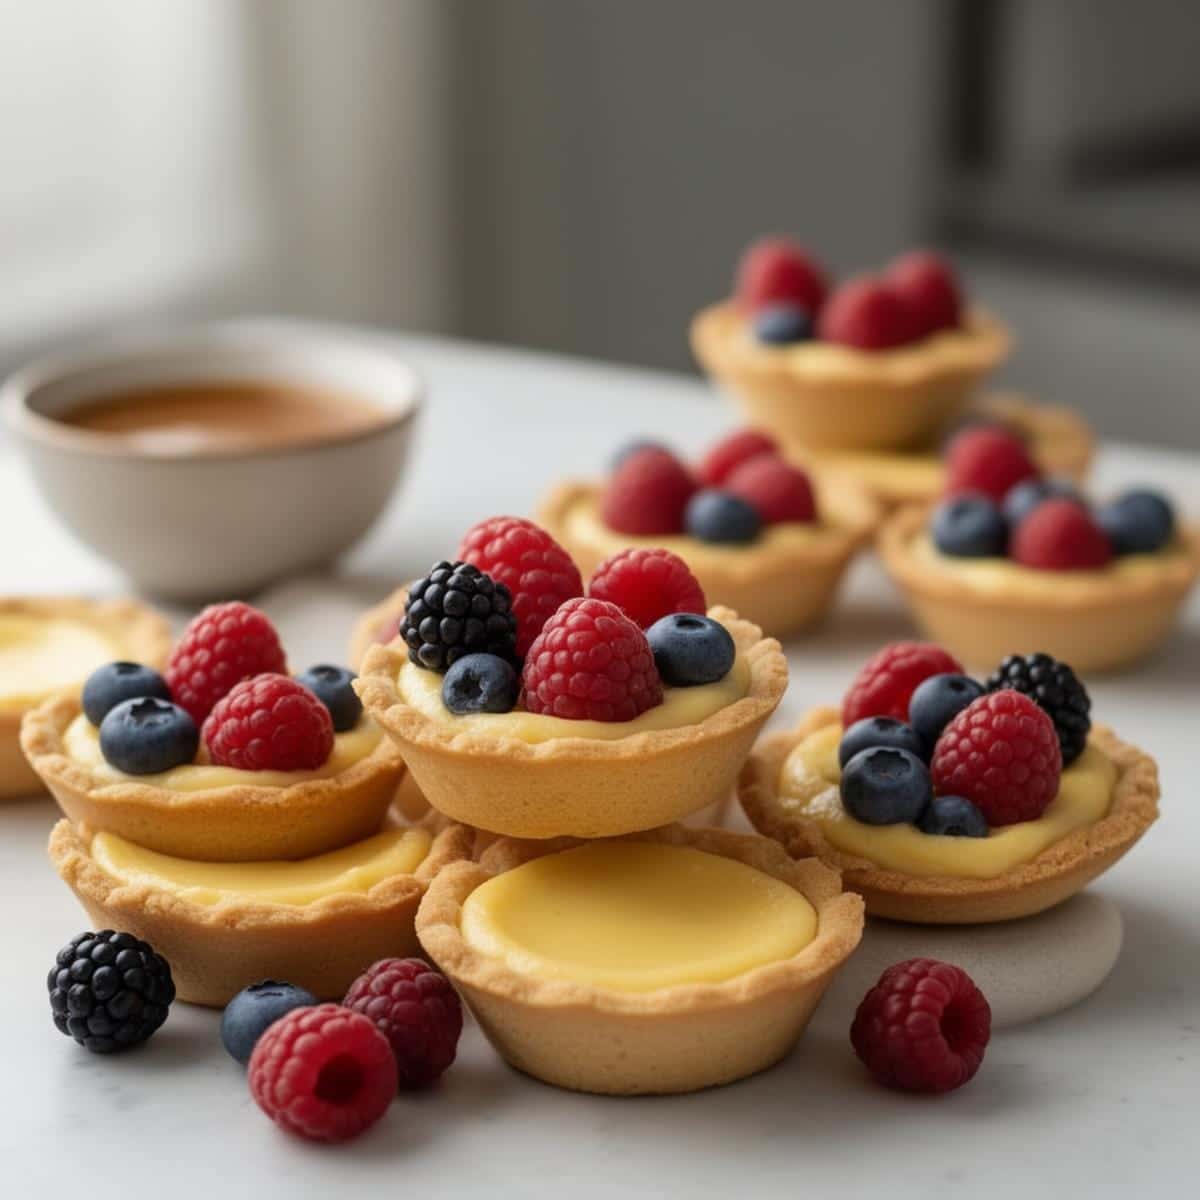
These Gluten-Free Mini Tarts are bite-sized delights that look as beautiful as they taste. Featuring a buttery, nutty almond flour shortbread crust that requires no rolling, they are filled with a luscious, light cream cheese whip and topped with vibrant fresh berries. Naturally grain-free and easy to assemble, they make the perfect elegant dessert for brunches, showers, or tea parties.
Ingredients
— The Almond Flour Crust —
1 ½ cups superfine blanched almond flour
3 tablespoons unsalted butter, melted (or coconut oil)
2 tablespoons pure maple syrup
1 teaspoon pure vanilla extract
⅛ teaspoon salt
— The Creamy Filling —
4 oz (115g) cream cheese, softened to room temperature
¼ cup plain Greek yogurt (full fat is best)
2 tablespoons powdered sugar (or honey)
½ teaspoon vanilla extract
1 teaspoon lemon zest (optional, for brightness)
— Toppings —
Fresh berries (raspberries, blueberries, blackberries, or sliced strawberries)
Fresh mint leaves (for garnish)
Instructions
1. Preheat Oven: Preheat your oven to 350°F (175°C). Lightly grease a mini muffin tin (12 holes) or mini tart pans with cooking spray.
2. Make Crust Dough: In a medium bowl, mix the almond flour, melted butter, maple syrup, vanilla, and salt. Stir until the mixture resembles moist crumbs and holds together when pressed.
3. Press Crust: Scoop about 1 heaping tablespoon of the dough into each muffin cup. Use your fingers or the back of a small measuring spoon to press the dough firmly into the bottom and slightly up the sides to create a cup shape.
4. Bake Crust: Bake for 10–12 minutes, or until the edges are golden brown. Watch closely as almond flour can brown quickly.
5. Cool (Crucial): Remove from the oven. If the centers have puffed up, gently press them down with a spoon while hot. Let the crusts cool completely in the pan. They are fragile when warm but will firm up as they cool.
6. Make Filling: While the crusts cool, whisk together the softened cream cheese, Greek yogurt, powdered sugar, vanilla, and lemon zest in a small bowl until smooth and creamy.
7. Assemble: Once the crusts are cool, carefully remove them from the pan (use a butter knife to pop them out). Spoon or pipe a dollop of filling into each tart shell.
8. Garnish: Top with fresh berries and a small mint leaf. Serve immediately or chill for up to 2 hours.
Notes
Almond Flour: Do not substitute with coconut flour; it absorbs moisture differently and will make the crust crumbly.
Room Temp Ingredients: Ensure the cream cheese is soft to avoid lumps in your filling.
Make Ahead: You can bake the crusts a day in advance and store them in an airtight container. Fill them just before serving to keep the crust crisp.
Dairy-Free Option: Use dairy-free cream cheese and coconut yogurt for the filling, and coconut oil for the crust.
- Prep Time: 20
- Cook Time: 12
- Category: Dessert
- Method: Baking
- Cuisine: French / American
Nutrition
- Serving Size: 1 tart
- Calories: 145
- Sugar: 6
- Sodium: 40
- Fat: 11
- Saturated Fat: 4
- Unsaturated Fat: 6
- Trans Fat: 0
- Carbohydrates: 8
- Fiber: 2
- Protein: 4
- Cholesterol: 15
Your Burning Questions Answered!
- Can I use a different gluten-free flour blend?
- Yes, but King Arthur Measure for Measure is recommended for the best results in your Gluten-Free Mini Tart.
- What can I use instead of pie weights?
- Dry rice or dry beans work perfectly as pie weights for your Gluten-Free Mini Tart shells.
Can I make these tarts ahead of time?
Absolutely! You can bake the shells ahead of time and store them as mentioned above. Fill them just before serving for the freshest taste.
Dig In & Enjoy!
Now that you have the perfect Gluten-Free Mini Tart recipe, it’s time to get baking! These mini tarts are versatile, delicious, and sure to be a hit with everyone. Enjoy the process and the delicious results.
For more delicious ideas, follow me on Pinterest.