If you’re searching for that perfect balance of a buttery shortbread crust and a sweet, zesty lemon filling, you’ve found it.
Table of Contents

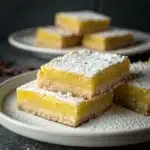
This is the ultimate recipe for classic Gluten-Free Lemon Bars. They are bright, decadent, and surprisingly simple to make from scratch.
Each bite is a burst of sunshine, guaranteed to be a new family favorite.
A Little Story About This Dish
I’ve always believed that lemon bars are one of life’s perfect desserts. The biggest challenge was creating a gluten-free version that didn’t compromise on that signature buttery, melt-in-your-mouth crust.
After a few attempts, I finally landed on this flawless recipe. The crust is crisp and tender, and the lemon filling is silky smooth and bursting with fresh flavor.
These Gluten-Free Lemon Bars are a tribute to that classic treat, and they disappear every single time I make them.
Get Ready to Cook!
Baking these perfect Gluten-Free Lemon Bars is a delightful two-part process: first, a crisp, buttery crust, then a silky, luscious lemon custard.
What to Expect
Time: About 45 minutes of active prep and baking, plus 2 hours of chilling time.
Difficulty: Very easy! This recipe is straightforward and perfect for beginners.
Before You Begin
The single most important tip is to use parchment paper that overhangs the sides of your baking pan. This creates a “sling” that makes it incredibly easy to lift the entire block of bars out for clean, perfect slicing later.
Also, for the brightest, most vibrant flavor, you must use freshly squeezed lemon juice. The bottled kind just doesn’t compare.
Chilling is a crucial final step. Giving your Gluten-Free Lemon Bars at least two hours in the fridge is the secret to letting the custard set up for those picture-perfect squares.
The Heart of the Dish: Ingredients You’ll Need
These simple ingredients are all you need to create the most decadent Gluten-Free Lemon Bars.
| Ingredient | Amount |
| For the Crust: | |
| Gum-Free Gluten-Free Flour Blend | 1 cup (140 g) |
| Confectioners’ Sugar | ½ cup (58 g) |
| Kosher Salt | ½ teaspoon |
| Zest of a Large Lemon | 1 |
| Unsalted Butter, melted and cooled | 9 tablespoons (126 g) |
| For the Filling: | |
| Large Eggs, room temperature | 4 |
| Granulated Sugar | 1 cup (200 g) |
| Baking Powder | ¾ teaspoon |
| Freshly Squeezed Lemon Juice | ⅔ cup |
| Gum-Free Gluten-Free Flour Blend | ⅔ cup (93 g) |
| Confectioners’ Sugar (for dusting) | For dusting |
Let’s Get Cooking! Step-by-Step Guide
Follow this guide to bake the most perfect Gluten-Free Lemon Bars you’ve ever tasted.
1. Prepare Your Pan and Oven:
First, preheat your oven to 325°F (165°C). Take an 8-inch square pan, grease it, and line it with two crisscrossed pieces of parchment paper so the ends hang over the sides. Grease the parchment paper as well.
2. Mix the Shortbread Crust:
In a medium bowl, whisk together 1 cup of the gluten-free flour, the confectioners’ sugar, salt, and fresh lemon zest.
3. Form and Bake the Crust:
Pour the melted butter into the dry ingredients and mix with a fork until it forms a thick, crumbly dough. Press this mixture firmly and evenly into the bottom of your prepared pan. Bake for about 15 minutes, until the crust is firm and lightly golden.

4. Whisk the Lemon Filling:
While the crust is baking, prepare your filling. In another bowl, whisk together the eggs, granulated sugar, baking powder, fresh lemon juice, and the remaining ⅔ cup of gluten-free flour until the mixture is smooth and well combined.
5. Assemble and Bake Again:
Once the crust is out of the oven, let it cool for just a minute, then pour the bright lemon custard mixture evenly over the top. Return the pan to the oven and bake for about 25 more minutes.

6. Know When They’re Done:
The bars are perfectly set when the center barely jiggles when you gently shake the pan.
7. Cool and Chill Completely:
Remove the pan from the oven and let it cool on a wire rack for about 20 minutes. Afterward, transfer the pan to the refrigerator to chill for at least two hours, or even overnight. This step is crucial for the filling to set properly.
8. Slice and Serve:
Once chilled and firm, use the parchment paper overhangs to lift the entire block from the pan. Dust the top of your Gluten-Free Lemon Bars generously with confectioners’ sugar, then slice into squares and serve cold.

Mastering the Dish: Pointers for Perfection & How to Store
A few final tips will ensure your Gluten-Free Lemon Bars are bakery-quality.
The key to a perfect custard filling is to avoid overbaking. The bars are ready when the center has just a tiny jiggle left. They will continue to set as they cool. For ultra-clean slices, run a large, sharp knife under hot water and wipe it dry between each cut.
Storage: These bars must be stored in the refrigerator. Place them in an airtight container, where they will stay fresh and delicious for up to a week. They are not ideal for freezing, as it can alter the delicate texture of the custard.
When you’re looking for your next gluten-free meal idea, these additional recipes offer a great starting point: The Viral 3 Ingredient Brownies with Banana and Gluten Free Red Velvet Brownies and Gluten-Free Sopapilla Cheesecake.
Your Burning Questions Answered!
Here are some answers to common questions about making Gluten-Free Lemon Bars.
1. My lemon filling is runny. What went wrong?
A runny filling is usually due to one of two things: underbaking or not chilling long enough. Make sure to bake until the center is just barely set. Most importantly, the bars must be chilled in the refrigerator for at least two hours—or even longer—to allow the custard to fully firm up before you slice into them.
2. Can I use bottled lemon juice instead of fresh?
For the absolute best and brightest flavor, freshly squeezed lemon juice is strongly recommended. Bottled lemon juice often has a duller, more muted taste that won’t give your Gluten-Free Lemon Bars that signature vibrant, zesty punch. The fresh zest in the crust also adds a layer of lemon flavor you’d miss out on.
3. Why is my crust soggy on the bottom?
A soggy crust can happen if the filling is poured onto a crust that is either too hot or too cool. It’s best to pour the lemon custard over the shortbread crust when it’s just come out of the oven or has only cooled for a minute or two. This allows the heat from the crust to start cooking the bottom of the filling immediately, creating a barrier that prevents sogginess.
Dig In & Enjoy!
Now you are ready to create the most delicious Gluten-Free Lemon Bars right in your own kitchen.
That buttery crust and luscious, tangy filling make for a truly unforgettable dessert. Enjoy every perfect bite.
For my newest content and recent updates, you can follow my journey on Pinterest.
The Ultimate Gluten-Free Lemon Bars (Sweet, Tart & Buttery)
- Total Time: 3 hours (includes chilling)
- Yield: 12 bars 1x
Description
The ultimate Gluten-Free Lemon Bars recipe! A crisp, buttery shortbread crust holds a thick layer of luscious, sweet, and tangy lemon custard filling. An easy and impressive dessert for any occasion.
Ingredients
1 ⅔ cups (233 g) gum-free gluten-free flour blend, divided
½ cup (58 g) confectioners’ sugar, plus more for dusting
½ teaspoon kosher salt
Zest of 1 large lemon
9 tablespoons (126 g) unsalted butter, melted and cooled
4 large eggs, at room temperature
1 cup (200 g) granulated sugar
¾ teaspoon baking powder
⅔ cup (5.33 fl oz) freshly squeezed lemon juice
Instructions
1. Preheat your oven to 325°F. Grease an 8-inch square pan and line with overhanging criss-crossed parchment paper. Grease the parchment.
2. Make the crust: In a bowl, whisk together 1 cup (140 g) of the flour, confectioners’ sugar, salt and lemon zest.
3. Add the melted butter and mix with a fork until combined. Press the mixture firmly and evenly into the bottom of the prepared pan.
4. Bake the crust for 15 minutes until firm. Let cool briefly.
5. Make the filling: In a separate bowl, whisk the eggs, granulated sugar, baking powder, lemon juice, and remaining 2/3 cup (93 g) flour until smooth.
6. Pour the custard mixture over the warm baked crust.
7. Bake for about 25 minutes, until the center is just set and barely jiggles.
8. Cool the pan for 20 minutes, then refrigerate for at least 2 hours until firm.
9. Lift the bars out using the parchment paper, dust generously with confectioners’ sugar, and slice into squares to serve.
Notes
Fresh Lemon Juice is Key: For the best bright, zesty flavor, do not use bottled lemon juice.
Don’t Skip Chilling: Chilling for at least two hours is essential for the custard filling to set properly for clean slicing.
Use a Parchment Sling: Letting the parchment paper overhang the sides of the pan makes it easy to lift the bars out without breaking them.
- Prep Time: 15 minutes
- Cook Time: 40 minutes
- Category: Dessert
- Method: Baking
- Cuisine: American
Nutrition
- Serving Size: 1 bar
- Calories: 292
- Sugar: 23g
- Sodium: 194mg
- Fat: 14g
- Saturated Fat: 8g
- Unsaturated Fat: 5g
- Trans Fat: 0.5g
- Carbohydrates: 47g
- Fiber: 2g
- Protein: 5g
- Cholesterol: 103mg