Table of Contents
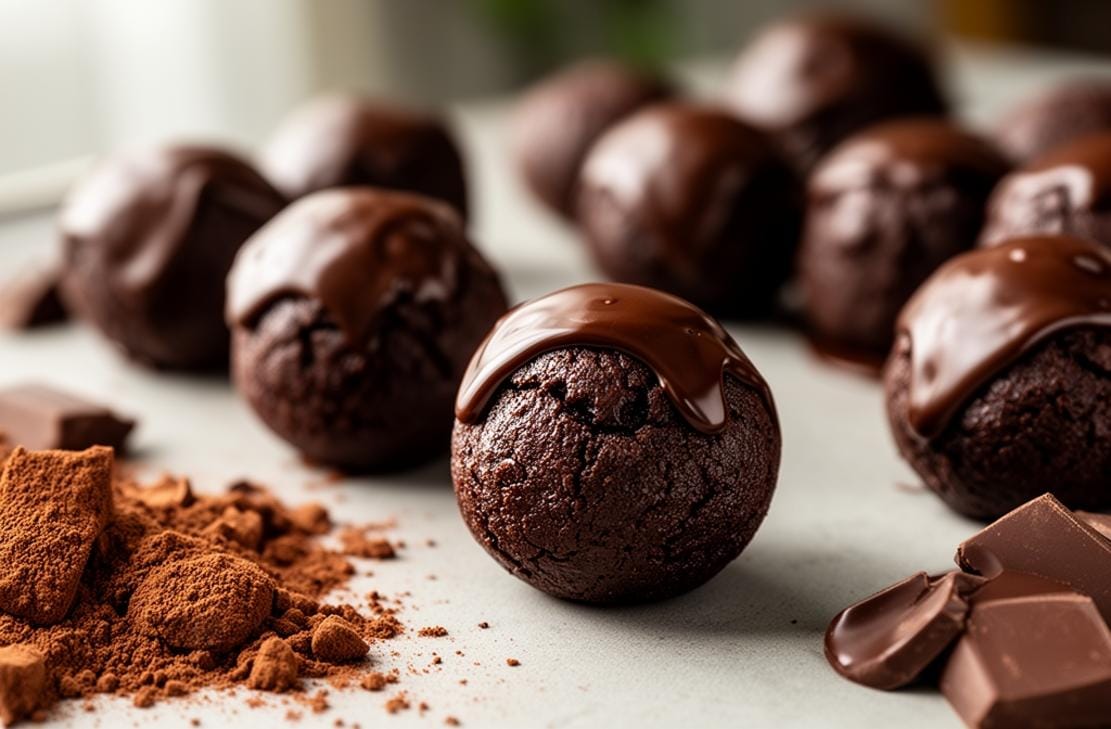
Indulge in these delicious gluten free baked chocolate donut holes that are perfect for any occasion. Whether you’re craving a sweet treat or need a quick dessert, these donut holes are sure to satisfy.
I remember the first time I made these gluten free baked chocolate donut holes. It was a rainy afternoon, and I wanted something sweet but didn’t want to spend hours in the kitchen. These donut holes were the perfect solution—quick, easy, and absolutely delicious!
Get ready to cook up a batch of these irresistible gluten free baked chocolate donut holes. They’re simple to make and even easier to enjoy!
What to Expect
- Time: Approximately 30 minutes
- Difficulty: Easy
Before You Begin
Before you start, make sure you have all your ingredients measured and ready to go. Preheat your oven to 350°F and spray a mini muffin pan with non-stick spray.
Ingredients You’ll Need
| Chocolate Donut Holes | Glaze |
|---|---|
| 1/4 cup butter, melted | 2 cups powdered sugar |
| 1/2 cup maple syrup (room temperature) | 8-10 tsp milk |
| 1/2 cup plain Greek yogurt (I prefer Fage 2%) | 1 tsp vanilla extract (optional) |
| 1/2 cup milk of choice (skim, 2%, whole or almond), heated to room temperature | |
| 2 tsp vanilla | |
| 2 eggs | |
| 2 cups gluten-free all purpose flour | |
| 1 tsp baking soda | |
| 1/2 tsp salt | |
| 1/2 cup cocoa powder |
Step-by-Step Guide
- Preheat your oven to 350°F. Spray a mini muffin pan with non-stick spray in each muffin cavity.
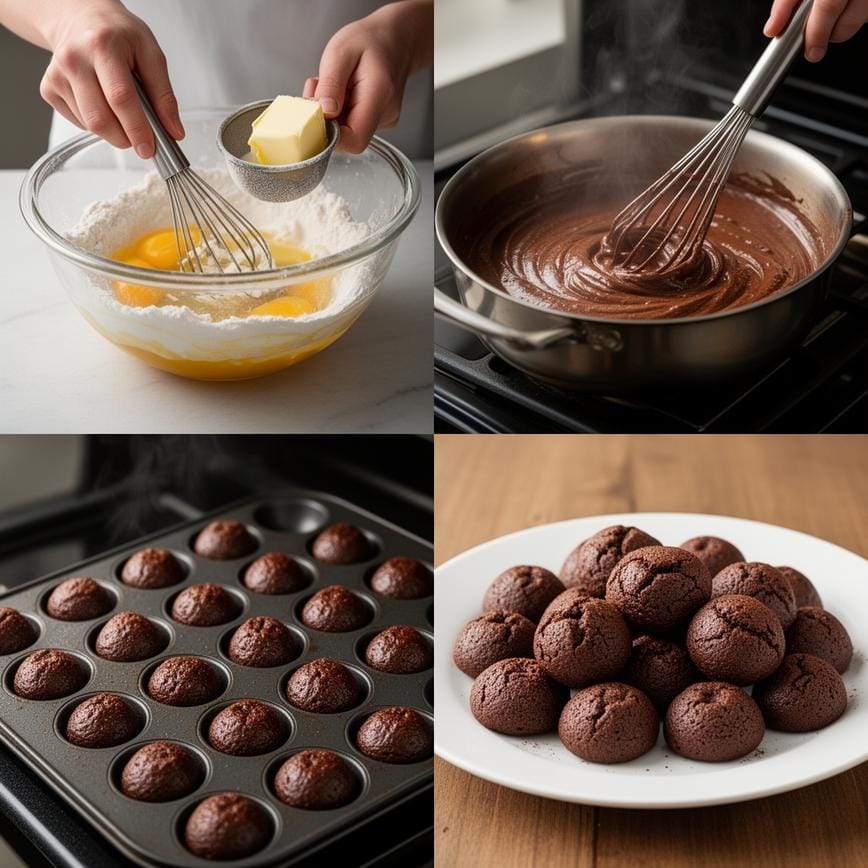
- To a large mixing bowl, add your butter and maple syrup and whisk them together.
- Add your Greek yogurt, milk, and vanilla and whisk till combined.
- Add your eggs and briefly mix them in.
- To the same bowl, add your flour, baking soda, and salt.
- Add a fine mesh strainer over the bowl, and sift your cocoa powder into the bowl. Stir till you have a thick, smooth donut batter.
- Using a small cookie scoop, scoop the donut batter into each mini muffin cavity till they’re all filled.
- Bake in the oven for 9-11 minutes, or till spongy to touch and a toothpick inserted comes out clean.
- Let them cool partially, then flip them out onto a cooling rack.
- To a mixing bowl, add your powdered sugar and 8 teaspoons of milk (and vanilla). Whisk till smooth. If your glaze is too thick, add one more teaspoon of milk.
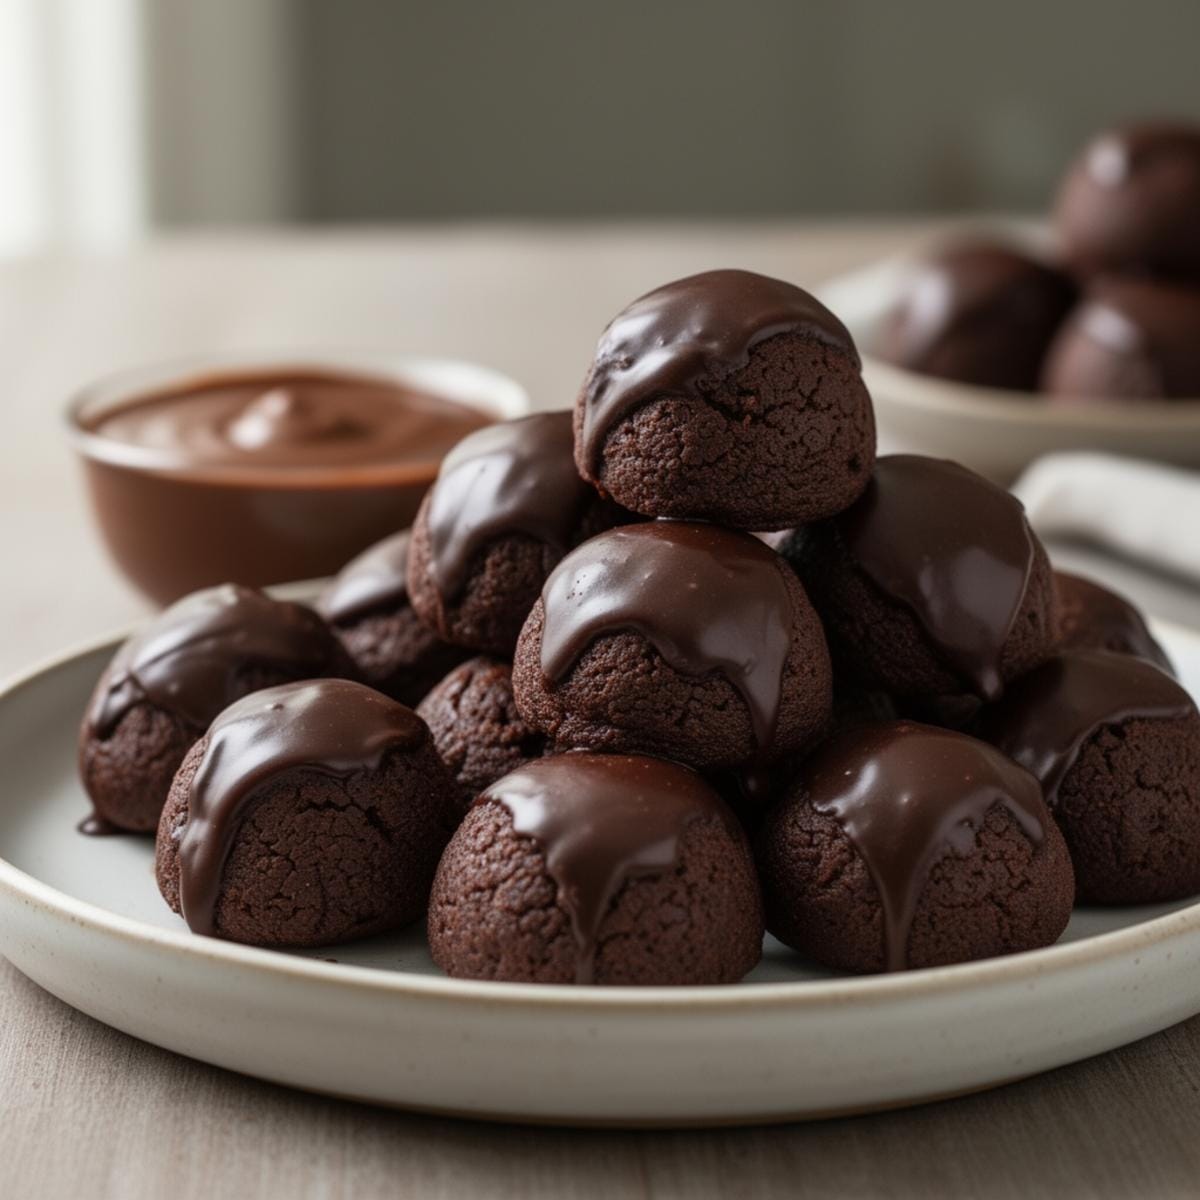
- Dip each donut hole into the glaze and roll it around till covered entirely. Gently shake any excess glaze off into the bowl, then place back on the cool rack (with a pan underneath for glaze drips).
- Repeat till all of the donut holes have been glazed. Devour!
Notes
Check the label for “May contain wheat” warnings. Hershey’s Cocoa and Rodelle are generally safe. Avoid bulk-bin cocoa powder where scoops are shared.
- Best: Use a Silicone Mini Muffin Pan. It releases the donuts easily (GF sticks to metal) and is easy to clean.
- Alternative: If using metal, scrub it aggressively and use cupcake liners if you aren’t 100% sure it’s clean.
- Sprinkles: Buy a certified GF brand (like Betty Crocker or Sweetapolita).
- Glaze: Simple powdered sugar + milk + vanilla is the safest and best glaze.
Pointers for Perfection & How to Store
For the best results, make sure your ingredients are at room temperature. This helps them mix together more smoothly and creates a better texture in your gluten free baked chocolate donut holes.
Store your donut holes in an airtight container at room temperature for up to 3 days. If you want to keep them longer, you can freeze them for up to a month.
If you’re looking for more delicious recipes, check out this Sweet Potato Brownies Recipe.
Print
Gluten free baked chocolate donut holes: Easy GF desserts
- Total Time: 25
- Yield: 24 donut holes 1x
- Diet: Gluten Free
Description
These Gluten-Free Baked Chocolate Donut Holes are light, fluffy, and satisfy that chocolate craving without the guilt of frying. Made easily in a mini muffin tin, they are sweetened with maple syrup and kept incredibly moist with Greek yogurt. Dip them in a classic vanilla glaze for the full donut shop experience right at home.
Ingredients
— Wet Ingredients —
¼ cup unsalted butter, melted (or coconut oil)
½ cup pure maple syrup (room temperature)
½ cup plain Greek yogurt (room temperature)
½ cup milk (room temperature)
2 large eggs, room temperature
2 teaspoons pure vanilla extract
— Dry Ingredients —
2 cups gluten-free all-purpose flour blend (measure for measure)
½ cup unsweetened cocoa powder
1 teaspoon baking soda
½ teaspoon salt
— The Glaze —
1 ½ cups powdered sugar
2–3 tablespoons milk
½ teaspoon pure vanilla extract
Instructions
1. Preheat your oven to 350°F (175°C). Spray a mini muffin tin generously with non-stick cooking spray (this recipe makes about 24-30 holes).
2. In a large mixing bowl, whisk together the melted butter and maple syrup until combined.
3. Add the Greek yogurt, milk, eggs, and vanilla extract. Whisk well until the wet mixture is smooth.
4. Add the gluten-free flour, baking soda, and salt to the bowl.
5. CRITICAL STEP: Place a fine-mesh sieve over the bowl and sift the cocoa powder into the mixture. (This ensures there are no bitter lumps of cocoa in your donuts).
6. Stir the batter gently with a spatula until just combined and smooth. The batter will be thick.
7. Using a small cookie scoop or spoon, fill the mini muffin cavities about ¾ full.
8. Bake for 9–11 minutes, or until the tops spring back when lightly touched and a toothpick inserted into the center comes out clean.
9. Let the donut holes cool in the pan for 5 minutes, then transfer them to a wire rack to cool completely before glazing.
10. Make the Glaze: In a small bowl, whisk together the powdered sugar, vanilla, and 2 tablespoons of milk. If the glaze is too thick, add more milk 1 teaspoon at a time until it is a dippable consistency.
11. Dip each cooled donut hole into the glaze, turning to coat evenly. Place back on the wire rack (with a sheet of parchment underneath to catch drips) and let the glaze set for 15 minutes.
Notes
Sifting Cocoa: Don’t skip sifting the cocoa powder! It clumps easily and is very difficult to whisk out once it’s in the wet batter.
Room Temp Ingredients: Using room temperature milk and yogurt prevents the melted butter from re-solidifying and making the batter grainy.
Storage: These are best eaten fresh but can be stored in an airtight container at room temperature for 2 days. The glaze may absorb into the donut over time (which is still delicious!).
Dairy-Free: You can substitute the butter for coconut oil, the Greek yogurt for a dairy-free yogurt (like almond or coconut based), and the milk for almond milk.
- Prep Time: 15
- Cook Time: 10
- Category: Breakfast
- Method: Baking
- Cuisine: American
Nutrition
- Serving Size: 1 donut hole
- Calories: 95
- Sugar: 10
- Sodium: 65
- Fat: 2
- Saturated Fat: 1
- Unsaturated Fat: 1
- Trans Fat: 0
- Carbohydrates: 18
- Fiber: 1
- Protein: 2
- Cholesterol: 15
Your Burning Questions Answered!
- Can I use a different type of flour?
- Yes, you can use any gluten-free all-purpose flour blend.
- Can I make these donut holes vegan?
- You can try using flax eggs and a dairy-free yogurt, but the texture may vary.
Can I bake these in a regular muffin pan?
Yes, but the baking time will be longer, around 15-20 minutes.
Dig In & Enjoy!
These gluten free baked chocolate donut holes are a delightful treat that everyone will love. They’re perfect for parties, snacks, or just a sweet indulgence. Enjoy every bite!
For more delicious ideas, follow me on My Pinterest.