Table of Contents
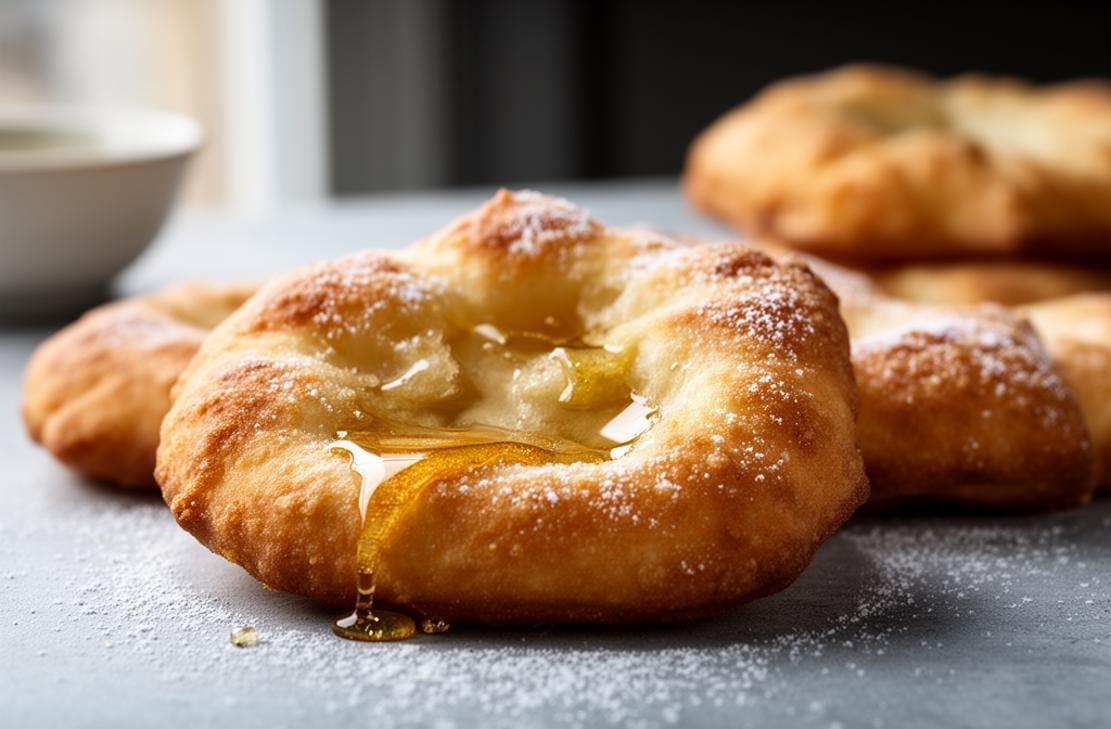
There’s something magical about golden, puffy fry bread—crispy on the outside, soft on the inside, and dusted with a delicate snowfall of confectioners’ sugar. But if you’re gluten-free, you might think this indulgent treat is off-limits. Think again! This gluten free fry bread recipe delivers all the satisfaction of the classic version, with a tender texture and irresistible flavor. Whether you’re craving a sweet treat or a savory base for tacos, this recipe is a game-changer.
Key Ingredients for the Best Gluten Free Fry Bread
The secret to perfect gluten free fry bread lies in the right blend of flours and starches. Here’s what makes this recipe work:
– All-Purpose Gluten Free Flour Blend – The base of the dough, providing structure.
– Expandex Modified Tapioca Starch – A crucial ingredient for that light, airy texture (see notes for substitutions).
– Xanthan Gum – Helps bind the dough since gluten isn’t present.
– Instant Yeast – Gives a slight rise and enhances flavor.
– Vegetable Shortening – Adds richness and helps with browning.
Ingredients List
| Ingredient | Amount |
|————————————|——————————–|
| All-purpose gluten free flour blend | 2 ⅝ cups (368 g) |
| 1 tsp Xanthan Gum (omit this if your flour blend already contains it). |
| Expandex modified tapioca starch | 6 tbsp (64 g) |
| Baking powder | 1 tbsp |
| Instant yeast | 1 tsp (3 g) |
| Granulated sugar | 1 tbsp (12 g) |
| Kosher salt | 1 ½ tsp (9 g) |
| Vegetable shortening (melted & cooled) | 2 tbsp (24 g) |
| Warm milk (about 95°F) | ¾ cup (6 fl oz) |
| Warm water (about 95°F) | ⅜ cup (3 fl oz), plus more as needed |
| Oil for frying | As needed |
| Confectioners’ sugar | For dusting |
Helpful Tools for Perfect Fry Bread
1. Deep Fry Thermometer – Ensures the oil stays at the perfect 350°F for even cooking.
2. Rolling Pin – Helps achieve uniform thickness for even frying.
3. 6-Inch Cake Cutter or Pot Lid – For perfectly round fry bread every time.
Pro-Tips for Success
1. Don’t Skip the Resting Time – Letting the dough rest for 15 minutes helps relax the gluten-free flours, making it easier to roll out.
2. Use the Right Oil Temperature – Too hot, and the outside burns before the inside cooks; too cool, and the bread absorbs excess oil.
3. For Extra Flavor – Add a pinch of cinnamon to the dough or a drizzle of honey after frying.
4. Follow 101GlutenFree on Pinterest for more gluten-free baking inspiration! 101GlutenFree
5. Substitute Expandex Carefully – If you don’t have Expandex, use Ultratex 3 (18g) + extra flour (404g total) for similar results.
How to Make Gluten Free Fry Bread
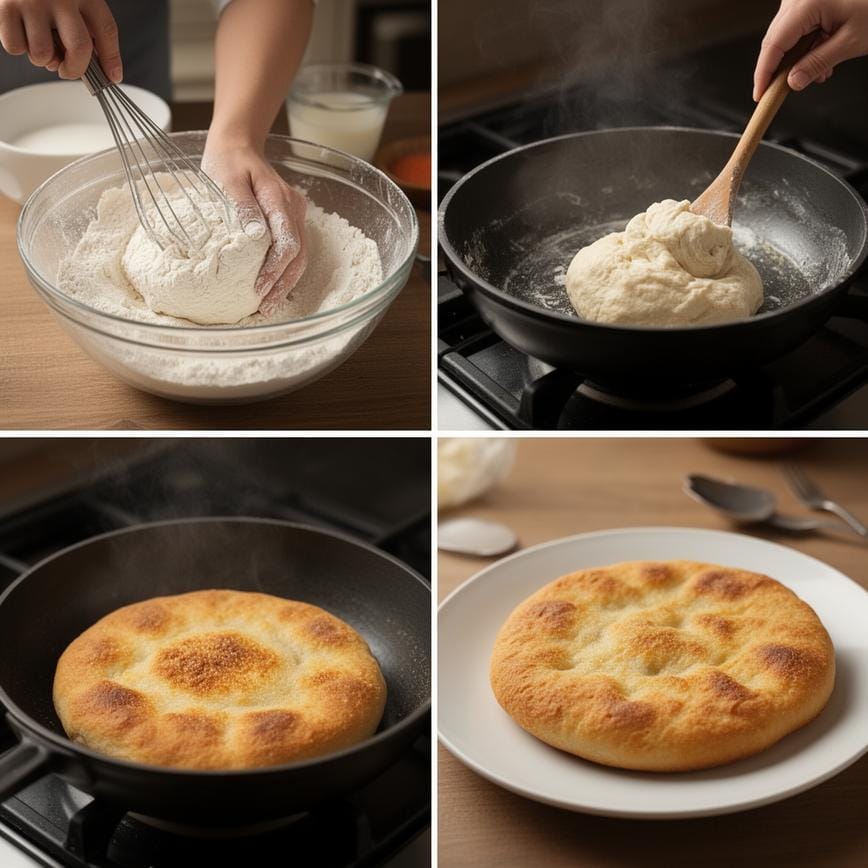
- 1. Mix Dry Ingredients – In a large bowl, whisk together the flour blend, Gluten Free Flour, Expandex, baking powder, yeast, and sugar. Add salt and whisk again.
- 2. Add Wet Ingredients – Make a well in the center and pour in the melted shortening, warm milk, and water. Mix until a dough forms.
- 3. Knead & Adjust – If the dough is too stiff, add water 1 tsp at a time until pliable but not sticky.
- 4. Rest the Dough – Wrap tightly in plastic and let sit at room temperature for 15 minutes.
- 5. Shape the Dough – Divide into 6 equal pieces (~4 oz each). Roll each into a 6-inch round, about ¼-inch thick.
- 6. Let Rise – Place on parchment paper, cover with oiled plastic, and let rise for 30 minutes.
- 7. Heat Oil – Heat oil to exactly 350°F (175°C) using a candy thermometer.
- 8. Fry to Perfection – Carefully slide in one round at a time, frying 1 minute per side until golden. Use tongs to flip gently.
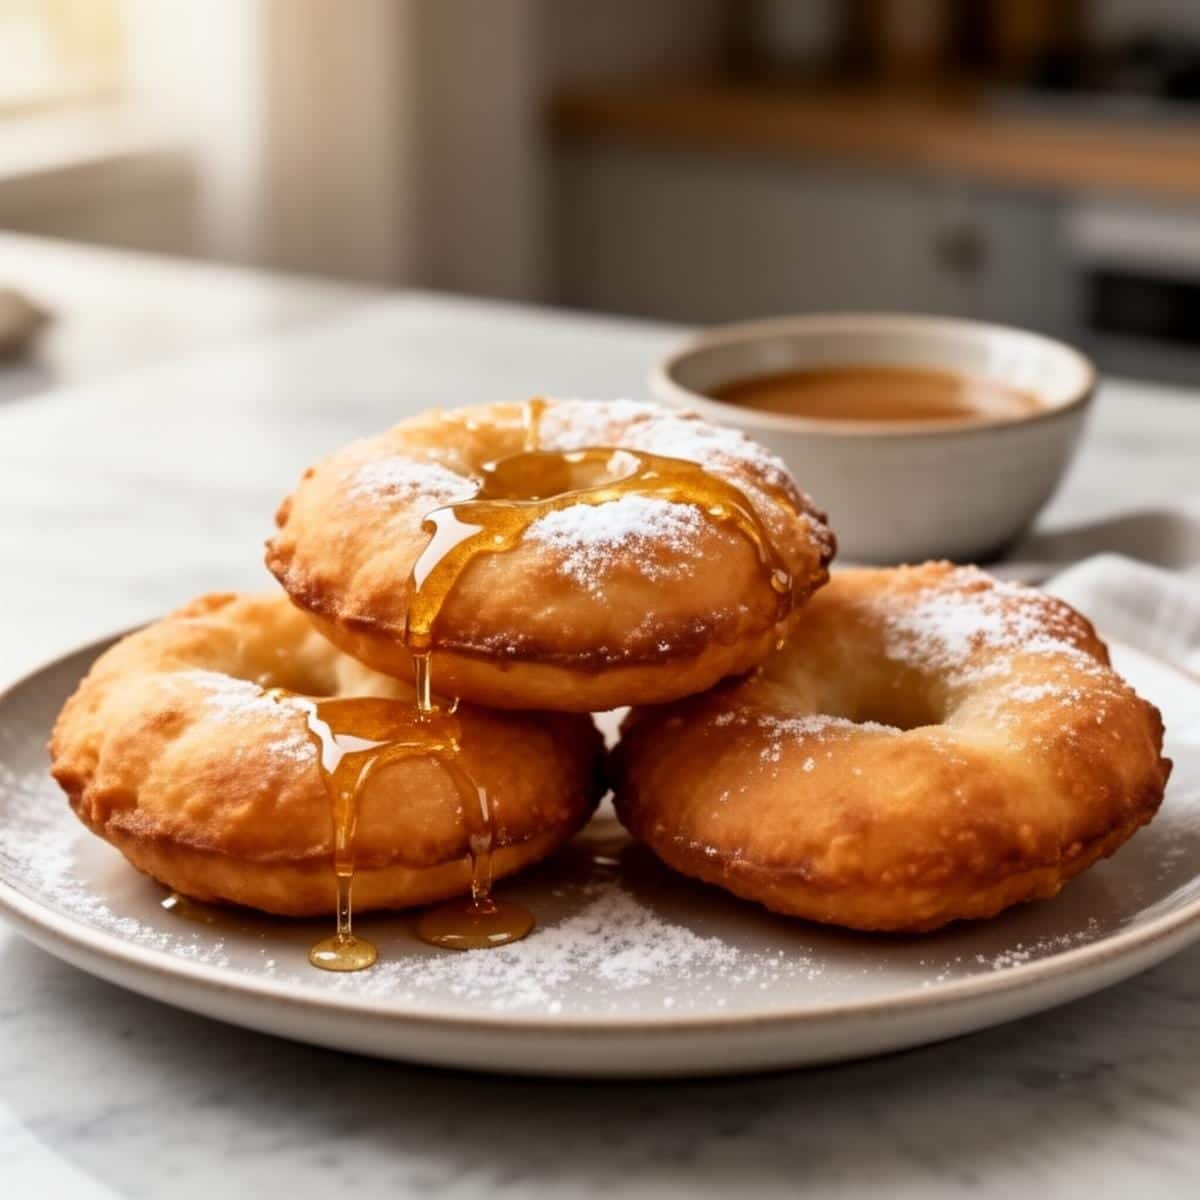
- 9. Drain & Serve – Transfer to paper towels, dust with confectioners’ sugar, and enjoy warm!
Delicious Variations to Try
1. Savory Fry Bread Tacos – Skip the sugar and top with seasoned ground beef, lettuce, and cheese.
2. Cinnamon Sugar Twist – Toss warm fry bread in cinnamon sugar for a sweet treat.
3. Pumpkin Spice Fry Bread – Add ½ tsp pumpkin pie spice to the dough for a fall-inspired version.

Crispy & Fluffy Gluten Free Fry Bread (Better Than Traditional!)
- Total Time: 90
- Yield: 6 fry breads 1x
- Diet: Gluten Free
Description
This Crispy, Fluffy Gluten-Free Fry Bread is arguably better than the traditional version. It features a golden, crunchy exterior and a soft, airy interior that doesn’t crumble. Perfect for Navajo tacos, or served simply with honey butter and jam. It’s the ultimate comfort food, completely wheat-free.
Ingredients
— Yeast Mixture —
2 teaspoons active dry yeast
2 tablespoons granulated sugar
6 tablespoons warm water (approx. 110°F/43°C)
— Dough Ingredients —
1 ½ cups gluten-free all-purpose flour blend (Cup4Cup is highly recommended for fluffiness)
⅛ teaspoon salt
⅓ cup full-fat coconut milk (or whole milk)
1 large egg, room temperature
2 tablespoons unsalted butter, melted
— For Frying —
Vegetable oil or canola oil (enough for 1-2 inches deep)
Instructions
1. In a small bowl, combine the warm water, yeast, and sugar. Stir gently and let it sit for about 10 minutes until the mixture is frothy and bubbly.
2. In a medium mixing bowl, whisk together the gluten-free flour and salt.
3. Add the frothy yeast mixture, coconut milk, egg, and melted butter to the dry ingredients. Mix until a smooth dough forms. It will be sticky.
4. Cover the bowl with plastic wrap and let the dough rise in a warm, draft-free place for 45–60 minutes. (Tip: You can preheat your oven to 200°F, turn it OFF, and place the dough inside to rise).
5. Once risen, place a sheet of parchment or wax paper on your counter and dust it generously with gluten-free flour.
6. Turn the dough onto the paper. Dust the top of the dough with flour and gently pat or roll it out to about ½-inch thickness.
7. Cut the dough into 3-inch squares or use a round cutter.
8. Heat the oil in a deep skillet or cast iron pan to 350°F (175°C).
9. Carefully place a few pieces of dough into the hot oil (do not overcrowd). Fry for about 1 ½ to 2 minutes per side, or until deep golden brown and puffy.
10. Remove from the oil and drain on a paper towel-lined plate. Serve warm with your favorite savory or sweet toppings.
Notes
Flour Choice: For the absolute best ‘fluffy’ texture, a blend like Cup4Cup or King Arthur Measure for Measure is recommended. Avoid blends that are heavy on bean flours.
Dairy-Free: You can make this entirely dairy-free by using the coconut milk listed and substituting the melted butter for melted vegan butter or oil.
Serving Ideas: Savory: Top with chili, lettuce, cheese, and salsa for ‘Indian Tacos’. Sweet: Dust with powdered sugar or drizzle with honey and cinnamon.
Make Ahead: The dough is best fried fresh, but you can mix the dough, let it rise, punch it down, and refrigerate it overnight before frying.
- Prep Time: 15
- Cook Time: 15
- Category: Bread
- Method: Frying
- Cuisine: American
Nutrition
- Serving Size: 1 fry bread
- Calories: 280
- Sugar: 5
- Sodium: 120
- Fat: 14
- Saturated Fat: 6
- Unsaturated Fat: 7
- Trans Fat: 0
- Carbohydrates: 34
- Fiber: 2
- Protein: 4
- Cholesterol: 45
FAQs About Gluten Free Fry Bread
Can I make this dairy-free?
Yes! Swap the milk for warm dairy-free milk (like almond or oat milk).
Why did my fry bread turn out dense?
Overmixing or not letting the dough rest can cause density. Follow the steps closely for best results.
Can I bake instead of fry?
While frying gives the best texture, you can bake at 400°F for 10-12 minutes (though it won’t be as crispy).
Final Thoughts
This gluten free fry bread is proof that you don’t have to miss out on beloved treats just because you’re avoiding gluten. With the right ingredients and techniques, you can enjoy crispy, fluffy, golden fry bread that’s just as delicious as the traditional version—if not better!
For more delicious ideas, follow me on My Pinterest.