Description
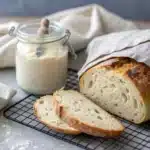
A light, airy summer gluten-free sourdough with a crisp, golden crust and tangy flavor. Perfect for sandwiches, avocado toast, or enjoying with butter. This recipe proves that gluten-free bread can rise beautifully and taste incredible.
Ingredients
50–100g (1⁄4–1⁄2 cup) active gluten-free sourdough starter (fed and bubbly)
375g (1 1/2 cups + 1 tbsp) warm water (about 80°F/27°C)
500g (4 cups + 2 tbsp) gluten-free bread flour blend (with xanthan gum or add 1 tsp separately)
9–12g (1.5–2.5 tsp) fine sea salt
Instructions
1. In a large bowl, whisk together the starter and warm water until fully combined and slightly bubbly.
2. Add the gluten-free flour and salt. Mix with a spatula or hand until a sticky, shaggy dough forms.
3. Cover with a damp towel and let rest for 30 minutes to allow the flours to hydrate.
4. Perform a series of stretch and folds: grab one side of the dough, stretch it upward, and fold it into the center. Rotate and repeat 4 times. Do this every 30 minutes for 2 hours (4 rounds total).
5. Cover and let the dough undergo bulk fermentation at room temperature for 6–10 hours, depending on your kitchen temperature. The dough is ready when it has increased by 50%, is bubbly, and jiggles when nudged.
6. Turn the dough onto a lightly floured surface. Gently shape into a round by folding edges into the center and rotating. Use a bench scraper to help tighten the surface.
7. Place the shaped dough into a floured proofing basket or bowl lined with a floured towel, seam side up.
8. Cover and refrigerate for 12–24 hours for cold fermentation (retards fermentation and enhances flavor).
9. Place a Dutch oven in your oven and preheat to 550°F (290°C).
10. Score the top of the dough with a sharp knife or razor blade, then use parchment paper to transfer it into the hot Dutch oven.
11. Bake covered for 30 minutes. Then remove the lid, reduce heat to 450°F (230°C), and bake for another 10–15 minutes until deeply golden brown.
12. For extra crispness, remove the loaf from the pot and bake directly on the rack for the last 5 minutes.
13. Cool completely on a wire rack for at least 1 hour before slicing to prevent gummy texture.
Notes
Use a strong, bubbly starter for best rise and flavor development.
Flour blends with psyllium husk or xanthan gum help mimic gluten’s elasticity.
For a lighter crumb, a 24-hour cold proof is highly recommended.
Store in a paper or linen bread bag for up to 3 days. Avoid plastic to keep the crust crisp.
Freeze sliced bread in an airtight bag for up to 3 months. Reheat in a toaster or oven.
- Prep Time: 30
- Cook Time: 45
- Category: Bread
- Method: Baking
- Cuisine: American
Nutrition
- Serving Size: 1 slice
- Calories: 220
- Sugar: 1
- Sodium: 350
- Fat: 2
- Saturated Fat: 0.5
- Unsaturated Fat: 1
- Trans Fat: 0
- Carbohydrates: 45
- Fiber: 3
- Protein: 4
- Cholesterol: 0