Description
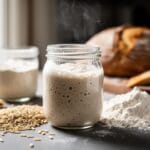
This Gluten-Free Sourdough Starter recipe is your gateway to baking artisan bread at home. By fermenting simple brown rice flour and water over 7 days, you will create a bubbly, living culture of wild yeast. This starter is robust, naturally gluten-free, and adds that signature tangy flavor and rise to all your favorite baked goods.
Ingredients
— The Essentials —
1 bag (approx. 24 oz) superfine brown rice flour (Arrowhead Mills or Anthony’s works well)
Filtered water (chlorine-free is best for fermentation)
— Equipment —
1 wide-mouth glass jar (quart size is ideal)
A digital kitchen scale (highly recommended for accuracy)
Plastic wrap or a loose-fitting lid
A rubber band (to mark growth)
Instructions
1. Day 1 (The Beginning): In your clean glass jar, mix 50g (approx. ⅓ cup) of brown rice flour and 50g (¼ cup) of filtered water. Stir vigorously to incorporate air. Cover loosely with plastic wrap or a lid (do not screw it tight; gases need to escape). Let sit at room temperature for 24 hours.
2. Day 2 (No Discard): You might see a bubble or two, or nothing at all—both are normal. Feed the starter by adding another 50g flour and 50g water. Stir well, cover, and let sit for another 24 hours.
3. Day 3 (Start Discarding): You may start to smell a funky or sour aroma. Stir the starter, then discard (remove) half of the mixture (about ½ cup). Feed the remaining starter with 50g flour and 50g water. Stir, cover, and rest for 24 hours.
4. Day 4 (Activity Increases): You should start seeing more bubbles and a pleasant sour smell. Discard half of the starter again. Feed with 50g flour and 50g water. Mark the level with a rubber band to track the rise.
5. Days 5-6 (Strengthening): Repeat the process: Discard half, feed 50g flour and 50g water. By now, the starter should be rising noticeably (growing past your rubber band mark) within hours of feeding.
6. Day 7 (Ready to Bake): If your starter doubles in size within 4–6 hours of feeding and smells yeasty/sweetly sour (not like nail polish remover), it is ready! Give it one last feed 4 hours before you plan to bake.
7. Maintenance: Once established, store your starter in the fridge. Feed it once a week: take it out, let it warm up, discard half, feed (50g flour/50g water), let it become bubbly (about 2-4 hours), then return to the fridge.
Notes
Flour Choice: Brown rice flour is the gold standard for GF starters because it ferments easily. Sorghum flour or buckwheat flour can also be used, but the hydration (water amount) may need adjusting.
Water Tip: If your tap water smells strongly of chlorine, boil it and let it cool, or leave it sitting out in an open jug overnight to let the chlorine evaporate. Chlorine can kill the wild yeast.
The ‘Ugly’ Phase: Around Day 3 or 4, the starter might smell like bad cheese or feet. This is the bacteria fighting for dominance. Keep feeding it! The good yeast will win, and the smell will turn pleasant.
Hooch: If you see a layer of grey liquid on top, it’s called ‘hooch’. It means your starter is hungry. Pour it off or stir it in, then feed immediately.
- Prep Time: 10
- Category: Basic
- Method: Fermentation
- Cuisine: Global
Nutrition
- Serving Size: 1 tablespoon
- Calories: 30
- Sugar: 0
- Sodium: 0
- Fat: 0
- Saturated Fat: 0
- Unsaturated Fat: 0
- Trans Fat: 0
- Carbohydrates: 7
- Fiber: 0
- Protein: 1
- Cholesterol: 0