Description
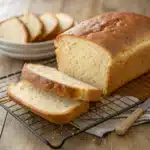
This is the best gluten free sandwich bread recipe you will ever make! It bakes up incredibly soft and fluffy with a rich, brioche-like flavor. It holds together perfectly for any sandwich, from a simple PB&J to a piled-high club. Say goodbye to dense, crumbly gluten-free bread forever.
Ingredients
For the Gluten Free Brioche Dough:
20 g (4 tbsp) whole psyllium husk
280 g (1 cup + 2½ tbsp) lukewarm water
230 g (2 cups) tapioca starch
135 g (1 cup) millet flour, plus extra for flouring
60 g (⅓ cup + 2 tbsp) sorghum flour
50 g (¼ cup) caster/superfine or granulated sugar
8 g (2½ tsp) instant yeast
8 g (2 tsp) baking powder
7 g (2¾ tsp) xanthan gum
12 g (2 tsp) salt
120 g (½ cup) whole milk, lukewarm
2 large eggs, room temperature
25 g (2 tbsp) sunflower oil, or other neutral-tasting oil
For the Egg Wash:
1 large egg white, whisked
Instructions
Step 1. Make the Psyllium Gel: In a bowl, mix together the psyllium husk and lukewarm water. Let stand for 30-45 seconds until a gel forms.
Step 2. Combine Dry Ingredients: In a stand mixer bowl, whisk together the tapioca starch, millet flour, sorghum flour, sugar, instant yeast, baking powder, xanthan gum and salt.
Step 3. Mix Wet Ingredients: Add the milk, eggs, and oil to the psyllium gel and mix well to combine.
Step 4. Knead the Dough: Pour the wet mixture into the dry ingredients. Using a dough hook, knead until smooth, then continue kneading for another 4-5 minutes. The dough will be very soft and sticky.
Step 5. Shape the Loaf: Turn the dough onto a generously floured surface. With floured hands, gently shape it into a log that fits snugly in a 9×5-inch loaf pan.
Step 6. Pan and Score: Carefully transfer the dough into the loaf pan. Use a sharp knife to make 3 diagonal slashes across the top.
Step 7. Proof the Dough: Cover lightly with plastic wrap and proof in a warm spot until doubled in size, about 1 hour 15 minutes to 1 hour 30 minutes.
Step 8. Preheat Oven: About 45 minutes into proofing, place a baking steel or heavy baking sheet on the lowest rack and preheat the oven to 400°F (200°C).
Step 9. Bake the Bread: Gently brush the proofed loaf with the whisked egg white. Place the pan directly on the hot baking steel and bake for 60-70 minutes, until deep golden brown. Cover with foil if it browns too quickly.
Step 10. Cool Completely: Immediately transfer the bread from the pan to a wire rack to cool completely before slicing. This step is crucial for the bread’s structure.
Notes
Working with the Dough: The dough is meant to be very soft and sticky! Use a generously floured surface and floured hands to make it manageable. Do not add more flour to the dough itself.
Stand Mixer Recommended: Due to the sticky nature of the dough, a stand mixer fitted with a dough hook is highly recommended.
Proofing Tip: If your kitchen is cold, create a warm proofing box by placing a cup of boiling water inside your (turned-off) oven along with the loaf.
Storage: Store the cooled loaf in a sealed container at room temperature for up to 4 days. It toasts beautifully!
- Prep Time: 20
- Cook Time: 70
- Category: Bread
- Method: Baking
- Cuisine: American
Nutrition
- Serving Size: 1 slice
- Calories: 175
- Sugar: 4 g
- Sodium: 310 mg
- Fat: 4 g
- Saturated Fat: 0.5 g
- Unsaturated Fat: 3 g
- Trans Fat: 0 g
- Carbohydrates: 30 g
- Fiber: 2 g
- Protein: 3 g
- Cholesterol: 23 mg