Description
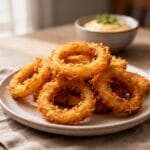
These Gluten Free Onion Rings are the ultimate crispy snack—golden, crunchy, and savory. Soaked in buttermilk to tenderize the onions and dredged in a seasoned gluten-free flour blend, they fry up to perfection without the heavy, doughy texture of wheat versions. Better than any diner appetizer, they are perfect for game day or a fun family dinner side.
Ingredients
2 large sweet onions (such as Vidalia), peeled
2 cups buttermilk (or homemade sour milk)
2 large eggs
2 cups gluten free all-purpose flour (ensure it contains xanthan gum)
1 teaspoon baking powder
1 teaspoon salt (plus extra for sprinkling)
1 teaspoon garlic powder
1 teaspoon paprika
1/2 teaspoon black pepper
1 quart vegetable oil or canola oil (for frying)
Instructions
1. Prep Onions: Slice the onions into 1/2-inch thick rounds. Carefully separate the rings.
2. Soak: In a large bowl, whisk together the buttermilk and eggs. Place the onion rings into the mixture, ensuring they are submerged. Let them soak for at least 15 minutes (or up to 1 hour in the fridge). This helps the coating stick and tenderizes the onions.
3. Prepare Breading: In a separate large shallow dish or Ziploc bag, combine the gluten free flour, baking powder, salt, garlic powder, paprika, and black pepper. Whisk to mix evenly.
4. Heat Oil: Pour the oil into a heavy-bottomed pot or Dutch oven (about 2 inches deep). Heat over medium-high heat until it reaches 375°F (190°C).
5. Dredge: Working in small batches, remove a few onion rings from the buttermilk, letting the excess drip off slightly. Toss them immediately into the flour mixture, coating them thoroughly. Tap off any excess flour.
6. Fry: Carefully place the coated rings into the hot oil. Do not overcrowd the pot. Fry for 2–3 minutes, flipping halfway through, until they are golden brown and crispy.
7. Drain: Remove the onion rings with a slotted spoon or spider strainer. Place them on a wire rack set over a baking sheet (or paper towels) to drain excess oil.
8. Serve: Season immediately with a pinch of extra salt if desired and serve hot with your favorite dipping sauce.
Notes
Oil Temperature: Maintaining the oil temperature at 375°F is crucial. If the oil is too cool, the breading will absorb too much grease and become soggy; too hot, and it will burn before the onion cooks.
Buttermilk Substitute: If you don’t have buttermilk, mix 2 cups of milk with 2 tablespoons of lemon juice or white vinegar and let it sit for 5 minutes.
Keep Warm: To keep the first batches warm while you fry the rest, place the fried rings on a baking sheet in a 200°F (95°C) oven.
Reheating: These are best eaten fresh. To reheat, place them in an oven or air fryer at 375°F for a few minutes. Do not microwave.
- Prep Time: 20
- Cook Time: 20
- Category: Appetizer
- Method: Frying
- Cuisine: American
Nutrition
- Serving Size: 1 serving
- Calories: 380
- Sugar: 6
- Sodium: 650
- Fat: 18
- Saturated Fat: 2
- Unsaturated Fat: 14
- Trans Fat: 0
- Carbohydrates: 48
- Fiber: 3
- Protein: 6
- Cholesterol: 5