Hello, Food Lovers! If there’s one thing that can make a weekend morning truly special, it’s a fresh, chewy bagel. But for those of us on a gluten-free diet, finding a real, authentic bagel can feel like a unicorn hunt. Most store-bought options are just bagel-shaped bread—gummy, dense, and utterly lacking that signature chew. This, my friends, is not that. This is the Best gluten free Bagels Recipe you’ve been waiting for.
Table of Contents

This is a true Gf Bagel Recipe, designed from the ground up to deliver everything we miss: a shiny, slightly crisp crust and a wonderfully chewy interior. This isn’t a low-carb bagel recipe made with almond flour; this is an Easy Bagel Recipe designed to replicate the classic New York-style experience, just without the gluten.
Get ready to transform your kitchen into your own personal bakery. This is the recipe that will bring the joy of a perfect gluten free bagel back to your breakfast table.
A Little Story About These Bagels
My favorite Sunday morning treat was always a classic everything bagel. After going gluten-free, that simple joy vanished, as every store-bought substitute was a profound disappointment—just sad, bagel-shaped bread. I became determined to recreate that authentic texture myself.
After many failed attempts where my dough either dissolved in the boiling water or baked into rocks, I finally cracked the code. The moment I pulled a batch of these beautiful, glossy bagels from the oven and took that first chewy bite, I knew I had succeeded. This gluten free bagels recipe is the reclamation of that beloved breakfast tradition.
Print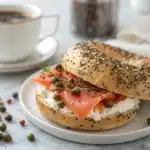
The Best Gluten Free Bagels: Chewy, Authentic & Easy to Make at Home
- Total Time: 100
- Yield: 8 bagels 1x
Description
This is a true Gf Bagel Recipe, designed from the ground up to deliver a shiny, slightly crisp crust and a wonderfully chewy interior. This Easy Bagel Recipe replicates the classic New York-style experience, just without the gluten!
Ingredients
FOR THE DOUGH:
30 g (6 tbsp) whole psyllium husk
540 g (2¼ cups) lukewarm water
220 g (1¾ cups + 2½ tbsp) tapioca starch
220 g (1½ cups + 2 tbsp) millet flour
80 g (½ cup + 2 tbsp) sorghum flour
20 g (1½ tbsp) granulated sugar
12 g (2 tsp) salt
8 g (2½ tsp) instant yeast
20 g (1½ tbsp) olive oil
FOR BOILING & FINISHING:
2–3 tbsp molasses
1 large egg, whisked
2–3 tbsp sesame seeds, or other toppings of choice
Instructions
1. Prep: Start preheating your oven to 450ºF (230ºC). Line a large baking sheet with parchment paper.
2. Make Psyllium Gel: In a small bowl, mix together the psyllium husk and lukewarm water. A gel will form in about 30-45 seconds.
3. Mix Dough: In a stand mixer bowl, whisk together the tapioca starch, millet flour, sorghum flour, sugar, salt, and instant yeast. Add the oil to the psyllium gel, then add the gel mixture to the dry ingredients. Knead with a dough hook until a smooth, firm dough forms.
4. Shape Bagels: Divide the dough into 8 equal portions (about 142g each). Roll each portion into a 10-inch rope. Overlap the ends by about 1 inch, pinch firmly to seal, and roll the seam on the counter to secure it.
5. Proof Briefly: Place the shaped bagels on a lightly floured surface, cover loosely with plastic wrap, and proof for only 30-40 minutes until just slightly puffed. Do NOT let them double in size.
6. Boil Bagels: Bring a large, wide pot of water with molasses to a rolling simmer. Gently drop in 2-4 bagels at a time. Boil for 30-45 seconds per side. Remove with a skimmer and let drain on a wire rack for a minute.
7. Top and Bake: Place drained bagels on the lined baking sheet. Brush generously with the whisked egg and sprinkle with your chosen toppings.
8. Bake: Place the sheet in the oven and immediately reduce the temperature to 400ºF (200ºC). Bake for 26-30 minutes, until deep golden brown.
9. Cool: Transfer bagels to a wire rack. Let them cool for at least 20-30 minutes before slicing, as the crumb needs time to set.
Notes
Don’t Over-proof: The short 30-40 minute proof is critical. Over-proofed bagels will collapse and become dense when boiled.
Psyllium is Key: Do not skip the psyllium husk. It is the essential ingredient that creates the authentic, chewy bagel texture.
Toasting is Best: These bagels are best on the day they are made. For days 2 and 3, slice and toast them to restore their amazing texture.
Oven Setup: For the best oven spring, preheat a baking steel or stone in your oven and place the baking sheet directly on top of it to bake.
- Prep Time: 30
- Cook Time: 30
- Category: Breakfast, Bread
- Method: Baking
- Cuisine: American
Nutrition
- Serving Size: 1 bagel
- Calories: 350
- Sugar: 4 g
- Sodium: 910 mg
- Fat: 7 g
- Saturated Fat: 1 g
- Unsaturated Fat: 5 g
- Trans Fat: 0 g
- Carbohydrates: 68 g
- Fiber: 8 g
- Protein: 6 g
- Cholesterol: 25 mg
Get Ready to Bake! (A Quick Overview)
What to Expect
This Gf Bagel Recipe is a fun and rewarding multi-step process that mirrors traditional bagel making. You will mix a unique dough, give it a very short proof, boil the bagels, and then bake them to golden perfection. From start to finish, you can have a batch of fresh, chewy gluten free bagels ready in under two hours. The steps are simple and the payoff is a truly authentic bagel experience.
Before You Begin
For the Best Bagel Recipe, a couple of prep steps are non-negotiable. First, start preheating your oven before you even begin mixing. It needs to be thoroughly hot when the bagels are ready to bake. Second, the magic ingredient here is psyllium husk gel—don’t be intimidated by it! It creates the structure and chew that’s missing in most gluten free bagels. Finally, pay very close attention to the short proofing time. Over-proofed bagels will collapse when boiled, so this step is crucial for success.
The Heart of the Dish: Ingredients You’ll Need
This authentic Gf Bagel Recipe relies on a unique blend of flours and a magic ingredient—psyllium husk—to create that perfect chew.

| Ingredient | Amount | Notes |
| FOR THE DOUGH | ||
| Whole Psyllium Husk | 30 g (6 tbsp) | This is essential for the chewy texture. |
| Lukewarm Water | 540 g (2¼ cups) | |
| Tapioca Starch | 220 g (1¾ cups + 2½ tbsp) | Can be swapped for cornstarch or potato starch. |
| Millet Flour | 220 g (1½ cups + 2 tbsp) | Or an equal weight of brown rice flour. |
| Sorghum Flour | 80 g (½ cup + 2 tbsp) | Or an equal weight of buckwheat or oat flour. |
| Sugar | 20 g (1½ tbsp) | Feeds the yeast. |
| Salt | 12 g (2 tsp) | |
| Instant Yeast | 8 g (2½ tsp) | |
| Olive Oil | 20 g (1½ tbsp) | |
| FOR BOILING & FINISHING | ||
| Molasses | 2-3 tbsp | For the boiling water, to get a classic crust. |
| Egg, whisked | 1 large | For the egg wash. |
| Toppings of choice | 2-3 tbsp | Sesame seeds, poppy seeds, or everything bagel seasoning. |
Let’s Get Cooking! Step-by-Step Guide
Follow these instructions for the best homemade gluten free bagels you’ve ever had.
Step 1: Prepare Your Station and Psyllium Gel
Before you do anything else, start preheating your oven to 450°F (230°C). A thoroughly hot oven is critical. Line a large baking sheet with parchment paper. Next, in a small bowl, whisk together the whole psyllium husk and the lukewarm water. Set it aside for about a minute; it will quickly transform into a thick gel.
Step 2: Mix the Bagel Dough
In the large bowl of your stand mixer (or a regular large bowl if mixing by hand), whisk together all the dry ingredients: tapioca starch, millet flour, sorghum flour, sugar, salt, and instant yeast. Add the olive oil to your prepared psyllium gel and mix it in. Make a well in the center of your dry ingredients and pour in the psyllium-oil mixture. Knead the dough with a dough hook or by hand for several minutes until it becomes smooth, firm, and pulls away from the sides of the bowl. It should not feel sticky.
Step 3: Shape the Bagels
Move the dough from the bowl onto a clean counter. You likely will not need any extra flour. Divide the dough into eight equal pieces, weighing about 142g each. Take one piece and flatten it slightly. Roll the dough up tightly into a small log, pinching the seam. Then, using the palms of your hands, roll the log into a rope about 10 inches long. Overlap the ends by about an inch, pinch them firmly together, and then roll the seam on the counter to seal it completely. Place the shaped bagel on a lightly floured tray.

Step 4: A Quick Proof
Once all your gluten free bagels are shaped, cover them loosely with plastic wrap. Let them proof in a warm spot for just 30-40 minutes. They will puff up slightly. Be very careful here: do not let them double in size. Over-proofed bagels will deflate in the next step, resulting in a dense, flat final product.
Step 5: Boil the Bagels
Fill a large, wide pot with at least 2 ½ inches of water and stir in the molasses. Bring the water to a boil, then reduce the heat to a steady, rolling simmer. Gently drop in 2-4 bagels at a time, being careful not to overcrowd the pot. Boil them for 30-45 seconds per side, then use a skimmer to remove them from the water. Let them drain on a wire rack for a minute.
Step 6: Egg Wash, Top, and Bake
Place the drained bagels on your parchment-lined baking sheet. Brush the tops and sides generously with the whisked egg. Now is the time to go wild with your toppings—sprinkle on sesame seeds, poppy seeds, or everything seasoning. Place the baking sheet in the oven and immediately reduce the temperature to 400°F (200°C). Bake for about 26-30 minutes, until the bagels are a deep, beautiful golden brown.
Step 7: Cool and Enjoy
Transfer the baked bagels to a wire rack. As tempting as it is, let them cool for at least 20-30 minutes before slicing. The inside crumb needs this time to set properly. Once they are warm, slice, toast, and enjoy the best gluten free bagels you have ever had.
Mastering the Dish: Pointers for Perfection & How to Store
To master this Gf Bagel Recipe, remember three key things. First, trust the psyllium gel. It looks strange, but it is the non-negotiable ingredient that provides the structure and chewiness of a real bagel. Second, respect the short proofing time. Unlike wheat doughs, these gluten free bagels should only look slightly puffed, not doubled. Over-proofing is the number one reason for flat, dense bagels.
Finally, do not skip the boil. A 30-45 second bath per side in molasses-spiked water is what creates that classic, shiny, slightly crisp crust that sets a real bagel apart from just round bread.
These gluten free bagels are truly at their peak on the day they are baked. However, they store beautifully. Store them in a sealed container on the counter, and they will be good for up to three days. To revive them, and this is essential, slice and toast them. Toasting brings the soft, chewy interior and the crisp crust right back to life.

Your Burning Questions Answered!
What bagels have no gluten?
A bagel is only gluten-free if it is specifically made with gluten-free ingredients and clearly marked as “gluten-free.” This can include homemade recipes like this one, or store-bought brands that use flours like rice, tapioca, millet, and psyllium husk instead of wheat.
Are bagels ok for gluten-free?
Traditional bagels made from wheat flour are absolutely not safe for a gluten-free diet. A standard bagel is a high-gluten food. To be “ok,” a bagel must be a certified gluten-free product made in a safe environment.
Does Wholefoods have gluten-free bagels?
Yes, Whole Foods typically carries several brands of gluten free bagels. You can usually find them in the freezer section. The selection varies by store, but they are a reliable place to look for commercially available options.
Do Dave’s Killer bread plain bagels have gluten?
Yes, Dave’s Killer Bread plain bagels contain gluten. While they are known for using whole and organic grains, their primary ingredient is organic wheat flour, making them unsafe for anyone with celiac disease or gluten sensitivity.
Dig In & Enjoy!
You are now fully equipped to make truly authentic, chewy, and delicious gluten free bagels in your own kitchen. Say goodbye to sad, bread-like impostors and hello to the real deal.
This recipe is more than just a set of instructions; it is a gateway to reclaiming one of the best breakfast traditions. So, roll up your sleeves, enjoy the process, and get ready to be amazed by what you have created. A perfect gluten free bagel is no longer a myth—it is in your hands. For more Gluten-Free recipes, follow me on Facebook and Pinterest.