
Table of Contents
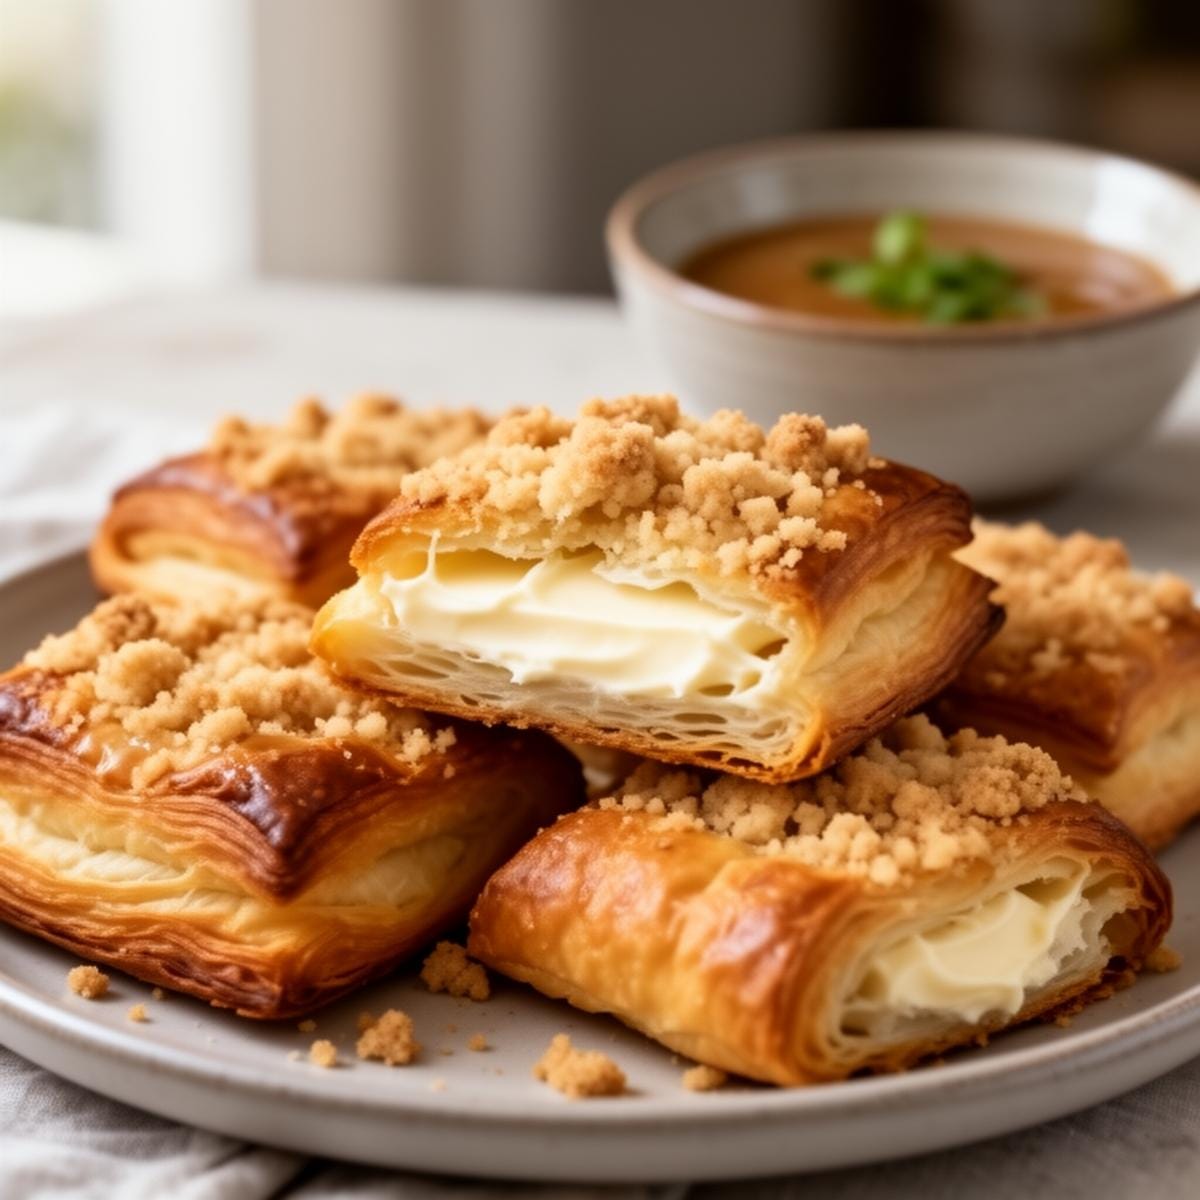
Craving flaky pastries without gluten? This Gluten-Free Cheese Danish Recipe delivers buttery layers wrapped around sweet cream cheese filling – they disappear faster than a sunrise!
As someone who thought gluten-free baking meant dry compromises, creating these pillowy danishes changed everything. A brunch accident with leftover puff pastry turned into our family’s most-requested treat.
Grab your apron and let’s make magic!
What to Expect
- Time: 30 minutes (15 prep + 15 baking)
- Difficulty: Easier than parallel parking!
Before You Begin
Thaw pastry overnight in fridge – NEVER microwave! Cold dough creates flakier layers. This Gluten-Free Cheese Danish Recipe works best with full-fat cream cheese at room temperature.
Ingredients You’ll Need
| Ingredient | Quantity |
|---|---|
| Gluten-free puff pastry | 1 sheet (thawed) |
| Cream cheese | 4 ounces (softened) |
| Granulated sugar | 2 tablespoons |
| Vanilla extract | 1/2 teaspoon |
| Fresh lemon juice | 1 teaspoon |
| Egg | 1 (for egg wash) |
| Powdered sugar | 1 tablespoon (optional) |
Step-by-Step Guide
- Preheat oven to 400°F (200°C). Line baking sheet with parchment paper.
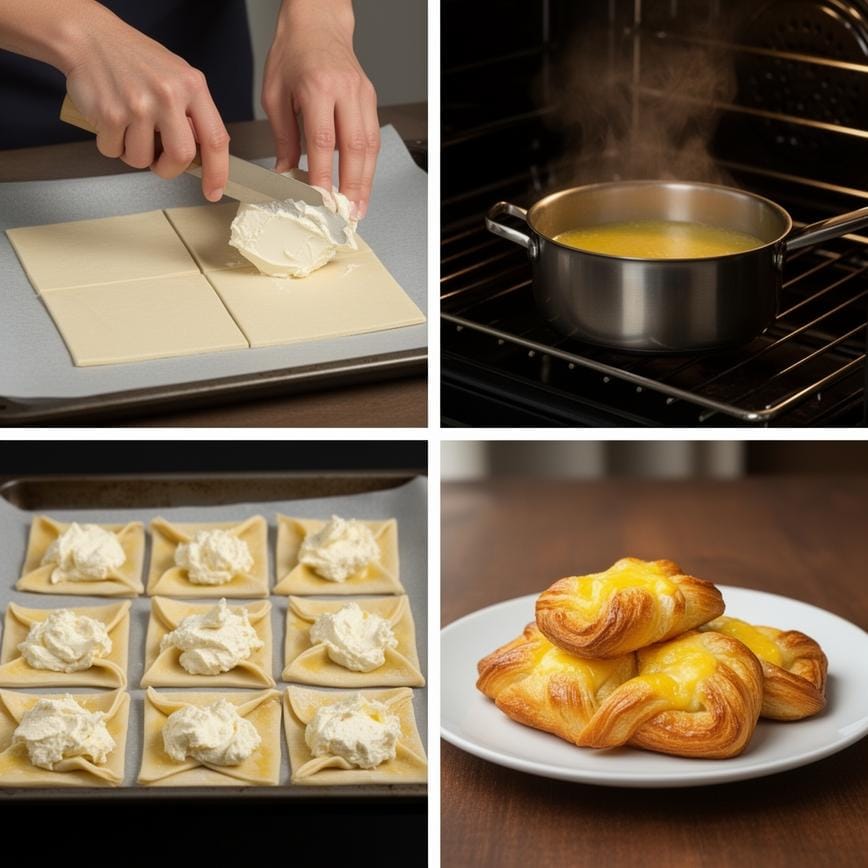
- Unfold thawed pastry onto prepared sheet – smooth any cracks with wet fingers.
- Beat cream cheese, sugar, vanilla, and lemon juice until perfectly smooth.
- Cut pastry into 4 equal squares using pizza cutter.
- Spoon heaping tbsp filling into center of each square.
- Fold opposite corners over filling, pressing lightly to seal.
- Brush pastries with beaten egg using pastry brush.
- Bake 15-18 minutes until deeply golden brown.
- Cool 5 minutes before dusting with powdered sugar.
Pointers for Perfection & How to Store
Store airtight at room temp 2 days. Refresh in air fryer 3 minutes for next-day crunch! Want more gluten-free snacks? Try our Gluten Free Pizza Roll Ups!
Print
Gluten-Free Cheese Danish Recipe
- Total Time: 110
- Yield: 8 danishes 1x
- Diet: Gluten Free
Description
Enjoy bakery-style pastries at home with this Gluten Free Cheese Danish recipe. These danishes feature a soft, golden yeast dough wrapped around a sweet, creamy cheese filling and drizzled with a simple vanilla icing. Perfect for breakfast or brunch, they taste just like the traditional version but are completely safe for a gluten-free diet.
Ingredients
— The Dough —
2 ½ cups gluten free all-purpose flour (ensure it contains xanthan gum)
¼ cup granulated sugar
2 ¼ teaspoons instant yeast (1 packet)
½ teaspoon salt
¾ cup warm milk (approx. 110°F)
¼ cup unsalted butter, melted
1 large egg, room temperature
— The Filling —
8 oz cream cheese, softened
⅓ cup granulated sugar
1 large egg yolk
1 teaspoon vanilla extract
1 teaspoon lemon juice (optional, for tang)
— Egg Wash & Glaze —
1 large egg + 1 tablespoon water (for egg wash)
½ cup powdered sugar
1 tablespoon milk
½ teaspoon vanilla extract
Instructions
1. Activate Yeast: In a small bowl, combine the warm milk and 1 teaspoon of the sugar. Stir in the yeast and let it sit for 5–10 minutes until the mixture is frothy.
2. Mix Dry Ingredients: In the bowl of a stand mixer fitted with the paddle attachment, whisk together the gluten free flour, the remaining granulated sugar, and salt.
3. Make Dough: Add the yeast mixture, melted butter, and the egg to the dry ingredients. Mix on low speed for 1 minute to combine. Scrape down the sides, then increase speed to medium-high and beat for 3 minutes. The dough will be soft and sticky.
4. First Rise: Scrape the dough into the center of the bowl and shape roughly into a ball. Cover the bowl with plastic wrap and place in a warm spot to rise for 1 hour. (Note: Gluten-free dough may not double in size, but it should look puffy and soft).
5. Prepare Filling: While the dough rises, beat the cream cheese, 1/3 cup sugar, egg yolk, vanilla, and lemon juice together until smooth and creamy.
6. Shape: Preheat oven to 375°F (190°C) and line a baking sheet with parchment paper. Turn the dough out onto a lightly floured surface. Divide the dough into 8 equal pieces. Roll each piece into a ball, then flatten into a 4-inch circle.
7. Fill: Place the circles on the baking sheet. Use your fingers or the bottom of a glass dipped in flour to press a depression into the center of each circle, leaving a rim around the edge. Spoon the cream cheese filling into the center.
8. Bake: Whisk the remaining egg with water to make an egg wash. Brush the exposed edges of the dough with the wash. Bake for 15–20 minutes, or until the pastry is golden brown.
9. Glaze: Allow the danishes to cool for at least 10 minutes. Whisk the powdered sugar, tablespoon of milk, and vanilla until smooth. Drizzle over the warm danishes and serve.
Notes
Dough Texture: Do not be alarmed if the dough is sticky; this is normal for gluten-free yeast dough. Use oiled or wet hands to help shape it.
Warm Milk: Ensure your milk is between 105-110°F. If it is too hot, it will kill the yeast; too cold, and the dough won’t rise.
Storage: These are best eaten the day they are baked. Leftovers can be stored in an airtight container for 2 days and reheated in the microwave for 10-15 seconds.
- Prep Time: 30
- Cook Time: 20
- Category: Breakfast
- Method: Baking
- Cuisine: American
Nutrition
- Serving Size: 1 danish
- Calories: 365
- Sugar: 22
- Sodium: 210
- Fat: 18
- Saturated Fat: 10
- Unsaturated Fat: 6
- Trans Fat: 0
- Carbohydrates: 42
- Fiber: 2
- Protein: 6
- Cholesterol: 85
Your Burning Questions Answered!
Q: Can I make Gluten-Free Cheese Danish dough ahead?
A: Yes! Prep filled danishes and freeze unbaked. Bake straight from frozen (+5 mins bake time).
Q: Can I use dairy-free cream cheese?
A: Absolutely! Use violife or kite hill for equally decadent vegan danishes.
Q: Why didn’t my pastry rise?
A: Over-handling dough melts butter layers. Handle edges only – hot oven does the rest!
Dig In & Enjoy!
This Gluten-Free Cheese Danish Recipe proves that dietary restrictions don’t mean sacrificing flavor. That buttery crunch? Total game-changer!
For more delicious ideas, follow me on Pinterest.