Table of Contents
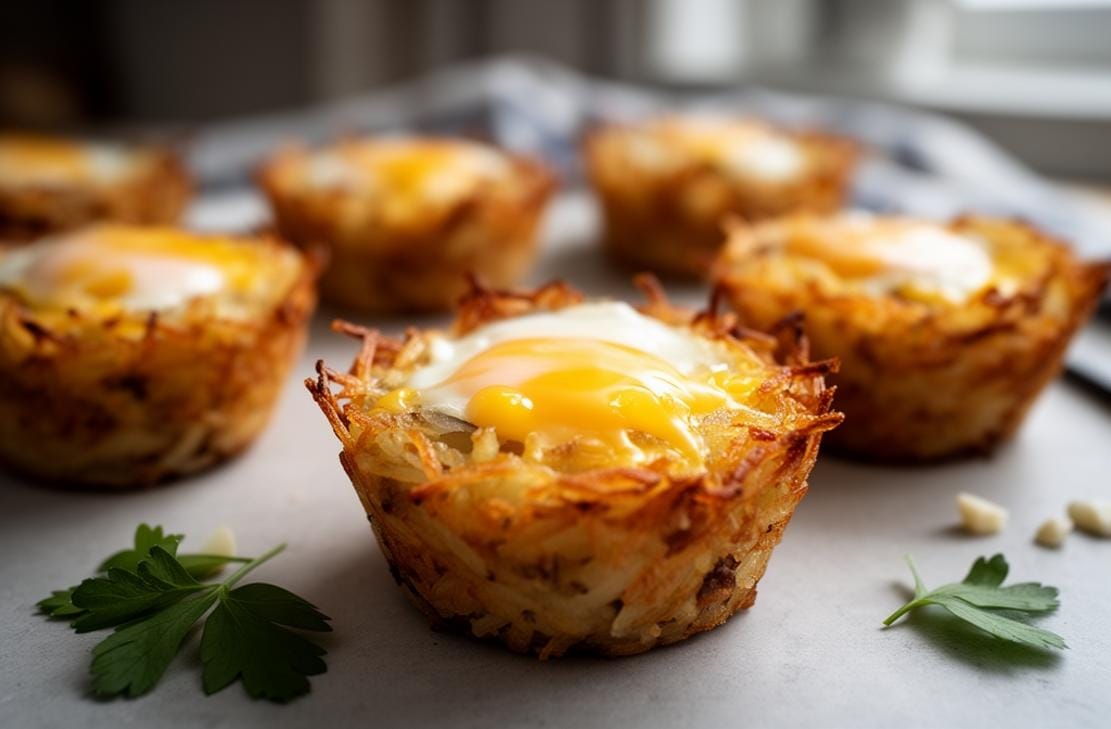
Start your day with a delightful twist on breakfast! These Hash Brown Egg Cups are crispy, cheesy, and packed with flavor. Perfect for meal prep or a hearty morning treat.
I remember the first time I made these Hash Brown Egg Cups. It was a lazy Sunday morning, and I wanted something special yet simple. The crispy hash browns paired with the creamy eggs and crumbled bacon were an instant hit with my family. Now, it’s a staple in our breakfast rotation!
Get ready to cook up a storm with this easy and delicious recipe!
What to Expect
- Time: Approximately 40 minutes
- Difficulty: Easy

Before You Begin
Before you start, make sure to thaw your hash browns if they’re frozen. Also, pre-cook your bacon and crumble it for easy assembly. Preheating your oven is key to getting those hash browns crispy!
Ingredients You’ll Need
| Ingredient | Quantity |
|---|---|
| Hash browns, thawed | 20 ounces |
| Large eggs | 8 |
| Kosher salt | 1 teaspoon |
| Ground black pepper | ¼ teaspoon |
| Sharp cheddar cheese | ½ cup |
| Bacon, cooked and crumbled | 4 slices |
| Chives or parsley (for serving) | To taste |
| Hot sauce (for serving) | To taste |
Step-by-Step Guide
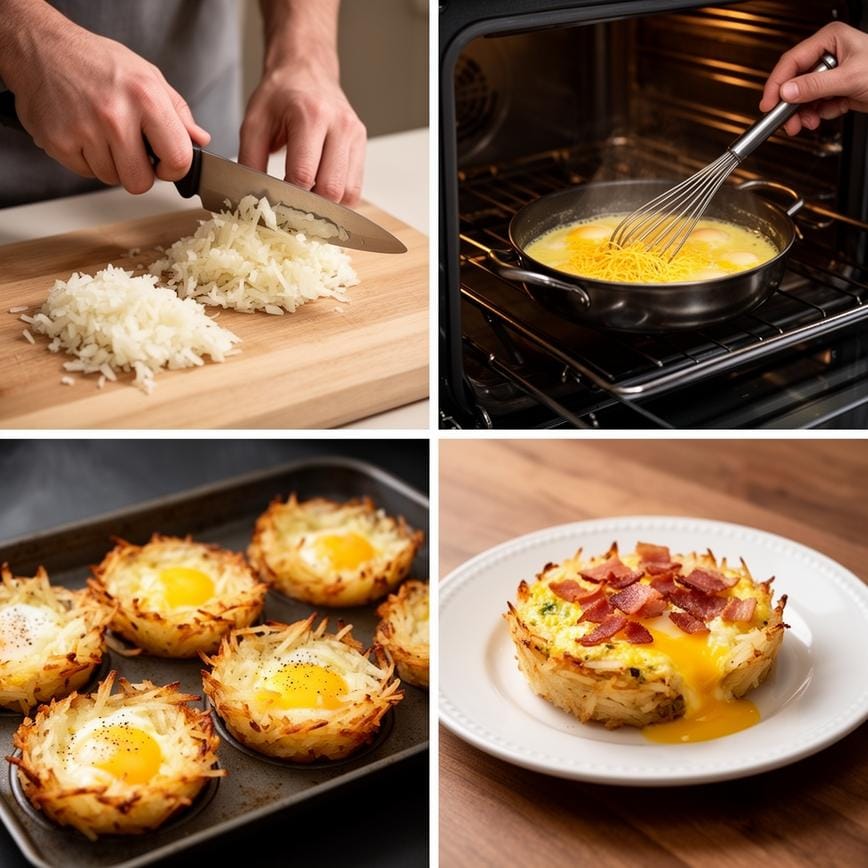
- Preheat your oven to 400°F. Spray a muffin pan generously with non-stick spray and set aside.
- Fill each muffin cup about 2/3 of the way full with the thawed hash browns. Press the hash browns against the sides and bottom to form a cup shape.
- Bake for 20 minutes, or until the edges are golden brown.
- While the hash browns are baking, whisk together the eggs, salt, and pepper in a bowl. Stir in the cheddar cheese.
- Reduce the oven temperature to 350°F.
- Fill the center of each hash brown cup with the egg mixture. If desired, add more cheese on top, then sprinkle with crumbled bacon.
- Bake for an additional 12-15 minutes, or until the eggs are set.
- Remove from the oven and let them sit for a couple of minutes. Use a knife to loosen the edges, then carefully pop the Hash Brown Egg Cups out of the pan.
- Garnish with chives or parsley and drizzle with hot sauce if desired.
Pointers for Perfection & How to Store
For extra crispy Hash Brown Egg Cups, make sure to press the hash browns firmly into the muffin tin. This helps them hold their shape and get that perfect crunch. If you’re meal prepping, store them in an airtight container in the fridge for up to 3 days. Reheat in the microwave or oven before serving.
Looking for more breakfast inspiration? Check out this amazing recipe: Spinach Egg Muffins With Feta Best Breakfast
Print
Hash Brown Egg Cups
- Total Time: 50
- Yield: 12 cups 1x
- Diet: Gluten Free
Description
These Hash Brown Egg Cups are the ultimate portable breakfast. Featuring a crispy, golden hash brown ‘nest’ filled with fluffy cheesy eggs and savory bacon, they are a fun and delicious way to start your day. Naturally gluten-free and easy to customize with your favorite veggies, they are perfect for meal prep or a festive weekend brunch.
Ingredients
— The Hash Brown Crust —
20 oz (approx. 4 cups) frozen shredded hash browns, thawed
3 tablespoons unsalted butter, melted (or olive oil)
½ teaspoon salt
¼ teaspoon black pepper
½ teaspoon garlic powder
— The Filling —
8 large eggs
¼ cup milk (dairy or unsweetened almond milk)
1 cup shredded cheddar cheese (or Gruyère)
4 slices cooked bacon, crumbled (or diced ham)
2 tablespoons fresh chives, chopped
Salt and pepper to taste
Instructions
1. Preheat & Prep: Preheat your oven to 400°F (200°C). Generously grease a standard 12-cup muffin tin with cooking spray or butter. This is crucial to prevent sticking.
2. Prepare Hash Browns: Squeeze the thawed hash browns in a clean kitchen towel to remove excess moisture (this ensures they get crispy). In a medium bowl, mix the hash browns with the melted butter, salt, pepper, and garlic powder.
3. Form Nests: Divide the hash brown mixture evenly among the 12 muffin cups. Use your fingers or the bottom of a small glass to press the potatoes firmly into the bottom and up the sides of each cup to create a ‘nest’ shape.
4. Bake Crusts: Bake the hash brown nests for 15–20 minutes, or until the edges are golden brown and crispy. Remove from the oven and reduce the temperature to 350°F (175°C).
5. Make Filling: While the crusts bake, whisk together the eggs, milk, and a pinch of salt and pepper in a bowl. Stir in the crumbled bacon (or other mix-ins) and half of the cheese.
6. Fill & Bake: Pour the egg mixture into the pre-baked hash brown cups. Top with the remaining cheese and fresh chives. Return to the oven and bake for 12–15 minutes, or until the eggs are set and slightly puffed.
7. Cool: Let the cups cool in the pan for 5–10 minutes. Run a butter knife around the edges to loosen them, then gently lift them out.
Notes
Thawing Hash Browns: You can thaw them overnight in the fridge or microwave them in a bowl for 1-2 minutes.
Crispy Factor: Squeezing out the water from the potatoes is the secret to a crunchy crust rather than a soggy one.
Variations: Swap bacon for spinach, diced peppers, or mushrooms for a vegetarian version. Use spicy sausage for a kick.
Storage: Store leftovers in an airtight container in the fridge for up to 4 days. Reheat in the microwave or air fryer.
- Prep Time: 15
- Cook Time: 35
- Category: Breakfast
- Method: Baking
- Cuisine: American
Nutrition
- Serving Size: 1 cup
- Calories: 160
- Sugar: 1
- Sodium: 320
- Fat: 10
- Saturated Fat: 4
- Unsaturated Fat: 5
- Trans Fat: 0
- Carbohydrates: 12
- Fiber: 1
- Protein: 8
- Cholesterol: 135
Your Burning Questions Answered!
- Can I use frozen hash browns?
- Yes, just make sure to thaw them completely before using.
- Can I make these ahead of time?
- Absolutely! These Hash Brown Egg Cups reheat beautifully.
What other toppings can I use?
Feel free to get creative with toppings like diced ham, bell peppers, or even a sprinkle of feta cheese.
Dig In & Enjoy!
These Hash Brown Egg Cups are a game-changer for breakfast. They’re easy to make, customizable, and absolutely delicious. Whether you’re meal prepping for the week or serving a crowd, this recipe is sure to impress. For more delicious ideas, follow me on Pinterest.