Welcome to the holiday side dish you’ve been dreaming of! Finding a truly delicious gluten free stuffing recipe can feel like a challenge. Many store-bought options are disappointing, and converting a traditional recipe isn’t always straightforward. This recipe changes all of that. It’s a classic, savory stuffing with the perfect texture that will have everyone at the table asking for seconds.
Table of Contents

A Little Story About This Dish
I’ll never forget my first Thanksgiving after switching to a gluten-free diet. The thought of missing out on my favorite side dish—the stuffing—was just heartbreaking. That’s what inspired me to perfect this gluten free stuffing recipe. After a few tries, I landed on this version. When I served it, no one even suspected it was gluten-free. It has since become a beloved, non-negotiable part of our holiday tradition.
Get Ready to Cook!
What to Expect
This gluten free stuffing recipe is surprisingly simple to put together. It takes about 30 minutes of active prep time, with a total baking time of around 45 minutes. The result is a wonderfully moist stuffing with a perfectly golden, toasty top. It’s a straightforward recipe perfect for cooks of all skill levels.
Before You Begin
The key to a great stuffing is perfectly dried bread cubes. Don’t skip the toasting step! This ensures the bread soaks up all the flavorful broth without turning into mush. Also, chopping your onion and celery uniformly helps them cook evenly for the best texture.
The Heart of the Dish: Ingredients You’ll Need
This homemade gluten free stuffing recipe uses simple, classic ingredients to create a flavor that is far better than any store-bought best gluten-free stuffing mix.
| Ingredient | Amount |
| Gluten-Free Bread | 1 loaf (12oz-18oz), sliced into small cubes |
| Olive Oil | 2 tablespoons |
| Butter | 1/4 cup |
| Large Onion | 1, chopped (about 1 1/4 cups) |
| Celery Stalks | 3, chopped (about 1 cup) |
| Garlic | 2 cloves, minced |
| Dried Thyme | 1 teaspoon |
| Ground Sage | 1/2 teaspoon |
| Ground Pepper | 1/4 – 1/2 teaspoon |
| Salt | To taste |
| Gluten-Free Soy Sauce | 1 teaspoon (optional) |
| Eggs | 2 |
| Chicken Stock | 1 1/2 cups |
Let’s Get Cooking! Step-by-Step Guide
1. Toast the Bread Cubes
First, set your oven to preheat to 300°F. Spread your gluten-free bread cubes across a large baking sheet with a rim. Drizzle them with olive oil and a pinch of salt, then toss everything together to coat the bread evenly. Bake the cubes for 30-35 minutes, stirring every 10 minutes. You’ll know they’re ready when they are completely dry and have a light golden toast. Set them aside to cool.
2. Sauté the Aromatics
While the bread toasts, melt your butter in a large skillet over medium-low heat. Add the chopped onion, celery, and a 1/4 teaspoon of salt. Cook this mixture slowly for about 15 minutes until the vegetables are completely soft and fragrant. Next, stir in the minced garlic, dried thyme, sage, pepper, another 1/4 teaspoon of salt, and the optional gluten-free soy sauce. Let it all cook together for another minute or two to bloom the spices, then remove the skillet from the heat.
(Make-Ahead Tip: If you’re prepping in advance, you can stop here! Store the cooked onion and celery mixture in an airtight container in the refrigerator and keep your toasted bread cubes at room temperature for up to a day.)

3. Prepare the Savory Custard
Preheat your oven to 375°F. Gently warm your chicken stock in the microwave or on the stovetop until it’s just simmering. In a separate bowl, whisk your two eggs together. Now, very slowly, pour a small amount of the hot stock into the eggs while whisking constantly. This tempers the eggs and prevents them from scrambling. Continue to slowly add the rest of the stock, whisking the entire time until fully combined.
4. Assemble Your Stuffing
In a large mixing bowl, combine the cooled bread cubes and the sautéed vegetable mixture. Pour the warm egg and stock mixture over everything. Gently fold it all together until the bread has absorbed the liquid. Be careful not to overmix! Transfer the stuffing to a greased 9×13 inch baking dish.

5. Bake to Golden Perfection
Cover the baking dish tightly with aluminum foil. Bake it for 30 minutes. After 30 minutes, remove the foil and continue baking for another 10-15 minutes. This last step gives the top that irresistible golden-brown, crispy finish. Let it rest for a few minutes before serving. Enjoy!
Mastering the Dish: Pointers for Perfection & How to Store
Choosing Your Bread: The type of gluten-free bread you use can make a difference. Heartier white breads hold their shape well. We’ve had great success with brands like Canyon Bakehouse Mountain White, Schar Artisan Baker White Bread, and Udi’s White Bread.
Dietary Adjustments: This gluten free stuffing recipe is easy to adapt. For a dairy-free version, simply use your favorite vegan butter. For a soy-free option, make sure your bread is soy-free and either omit the soy sauce or replace it with coconut aminos.
Make-Ahead & Storage: To save time, you can toast the bread and sauté the vegetables a day in advance. Store the cooled bread cubes in a sealed bag at room temperature and the cooked vegetable mixture in the fridge. Once baked, any leftover stuffing can be stored in an airtight container in the refrigerator for up to 4 days. Reheat in the oven or microwave until warmed through. here are some other recipes to explore: Gluten free cinnamon pull-apart bread, Easy Gluten Free Enchiladas.

Your Burning Questions Answered!
What spices are in gluten-free stuffing?
The most common and classic spices for a fantastic stuffing are thyme and sage. This recipe uses dried thyme, ground sage, garlic, salt, and pepper to create that traditional savory flavor everyone loves.
Is Pepperidge Farm stuffing gluten-free?
No, traditional Pepperidge Farm stuffing mixes are made with wheat flour and are not gluten-free. It is always important to use a specifically labeled gluten-free bread or mix to create a safe and delicious gluten free stuffing recipe.
Does gluten-free bread work for stuffing?
Absolutely! The key is to make sure the gluten-free bread is thoroughly dried out or stale before you mix it with the wet ingredients. Toasting the bread cubes, as this recipe directs, removes the moisture and allows them to soak up the broth and seasonings without becoming gummy, creating the perfect texture.
Dig In & Enjoy!
Now you have the perfect gluten free stuffing recipe to complete your holiday table. It’s a dish that brings comfort and joy, proving that eating gluten-free doesn’t mean sacrificing flavor or tradition. You can find more content and all my latest updates by following me.
Print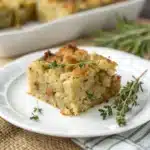
Gluten Free Stuffing Recipe Your Family Will Love
- Total Time: 75
- Yield: 8 1x
Description
This is the ultimate Gluten Free Stuffing Recipe your family will love! It’s savory, moist, and has a perfectly toasted top. A classic holiday side dish that no one will guess is gluten-free.
Ingredients
1 loaf gluten-free bread (12oz-18oz), sliced into small cubes
2 tablespoons olive oil
1/4 cup butter
1 large onion, chopped (1 1/4 cups)
3 stalks celery, chopped (1 cup)
2 cloves garlic, minced
1 teaspoon dried thyme
1/2 teaspoon ground sage
1/4–1/2 teaspoon ground pepper
salt to taste
1 teaspoon gluten-free soy sauce (optional)
2 eggs
1 1/2 cups chicken stock
Instructions
1. Preheat the oven to 300°F. Place the cubed bread on a rimmed baking sheet and drizzle with the olive oil. Add a pinch of salt and toss to evenly combine. Bake, stirring every 10 minutes, for 30-35 minutes until dry and slightly toasted. Let cool.
2. In a skillet over medium-low heat, add the butter and melt. Add the onion, celery, and 1/4 teaspoon salt and cook until completely soft, about 15 minutes. Add the garlic, thyme, sage, pepper, 1/4 teaspoon salt, and gluten-free soy sauce (if using) and cook for another 1-2 minutes. Remove from heat and set aside.
3. Preheat the oven to 375°F. Heat the chicken stock in the microwave or in a skillet until just simmering. Place the eggs in a bowl and whisk to combine. Slowly add the hot stock to the eggs, starting with just a few tablespoons while whisking constantly. Add the rest of the stock while whisking.
4. Place the bread cubes, celery/onion mixture and stock/egg mixture in a large bowl and gently stir to combine. Pour into a greased 9×13 baking dish and cover tightly with tin foil.
5. Bake covered for 30 minutes. Uncover and continue to bake for another 10-15 minutes until golden and toasted on top. Serve and enjoy!
Notes
MAKE-AHEAD: Follow the recipe until after you’ve sauteed onions and celery. Then store the celery/onion mixture in the fridge until the next day and keep the toasted bread at room temperature. When ready to bake, continue following the recipe as usual.
GLUTEN-FREE BREAD: I’ve made this stuffing with gluten-free bread using a variety of brands. Canyon Bakehouse Mountain White, Schar Artisan Baker White Bread or Udi’s White Bread all work great.
DAIRY-FREE: Be sure to use a dairy-free bread. Use vegan butter in place of the regular butter.
SOY-FREE: Be sure to use a soy-free bread. Omit the soy sauce or use coconut aminos.
- Prep Time: 30
- Cook Time: 45
- Category: Side Dish
- Method: Baking
- Cuisine: American